
HashiCorp Vault Enterprise - Performance Replication on Kubernetes
This blog post dives into the technical implementation of Vault Enterprise replication within a Kubernetes environment. We’ll explore how to set up performance and disaster recovery replication, overcome common challenges, and ensure smooth synchronization between clusters. Whether you’re aiming for redundancy or better data locality, this guide will equip you with the insights and tools needed to leverage Vault’s enterprise-grade features in Kubernetes effectively.
Architecture

Prerequisites
- 2 Kubernetes clusters. *Note: for simulation purposes, you can also use a single Kubernetes cluster with multiple namespaces to host both Vault clusters.
- Helm installed
- kubectl installed
- Vault CLI installed
- jq installed
- Vault Enterprise license
Note: for this implementation LoadBalancer services are used on Kubernetes to expose the Vault services (the API/UI and the cluster address for replication). It is highly recommended to use a LoadBalancer rather than ingress to expose the cluster address for replication. Vault itself performs the TLS termination as the TLS certificates are mounted to the Vault pods from Kubernetes. Additionally, note that when enabling the replication, the primary cluster points to the secondary cluster address (port 8201) and not the API/UI address (port 8200). When the secondary cluster applies the replication token, however, it points to the API/UI address (port 8200) to unwrap it and compelete the setup of the replication. We will see this in more detail in the implementation section.
Implementation
First, clone my GitHub repository for this implementation.
git clone https://github.com/itaytalmi/vault-ent-replication-k8s.git
cd vault-ent-replication-k8s
Issue TLS Certificates
You can use the terraform-tls folder to issue TLS certificates for your Vault clusters. Here is an example terraform.tfvars file containing the necessary variables:
common_name  = "*.demo.cloudnativeapps.cloud"
dns_names    = ["*.demo.cloudnativeapps.cloud", "*.vault-internal", "vault"]
ip_addresses = ["127.0.0.1"]
Note: You can use any other way to issue TLS certificates for your Vault clusters, as long as they contain the necessary DNS names and IP addresses. The
*.vault-internalDNS name is used internally by the Vault pods to communicate with each other, and thevaultDNS name is used internally as the Vault leader hostname for the auto join process.
For this example, I’m using a wildcard certificate for the *.demo.cloudnativeapps.cloud domain, but in a real-world scenario, you should use the specific hostname of each Vault cluster.
Primary Vault Cluster Deployment
First, switch to the context of the Kubernetes cluster where you want to deploy the Vault primary cluster.
kubectl config use-context <context-name>
Set your Vault license file in the vault-license.yaml file, and the TLS certificate, key and CA in the vault-tls-certs.yaml file.
Then, apply the TLS certificates and the Vault license.
kubectl apply -f vault-tls-certs.yaml
kubectl apply -f vault-license.yaml
Example output:
namespace/vault created
secret/tls-server created
secret/tls-ca created
secret/vault-lic created
Before deploying the Vault cluster, let’s go over the Helm values file (vault1-helm-values.yaml) and review the parts worth mentioning and explaining:
global:
  tlsDisable: false

server:
  image:
    repository: hashicorp/vault-enterprise
    tag: 1.18.3-ent
  service:
    enabled: true
    type: LoadBalancer
    active:
      enabled: true
      annotations:
        external-dns.alpha.kubernetes.io/hostname: vault1-active.demo.cloudnativeapps.cloud

  enterpriseLicense:
    secretName: vault-lic

  volumes:
    - name: tls-server
      secret:
        secretName: tls-server
    - name: tls-ca
      secret:
        secretName: tls-ca

  volumeMounts:
    - name: tls-server
      mountPath: /vault/userconfig/tls-server
    - name: tls-ca
      mountPath: /vault/userconfig/tls-ca

  extraEnvironmentVars:
    VAULT_CACERT: /vault/userconfig/tls-ca/ca.crt

  standalone:
    enabled: false

  ha:
    enabled: true
    replicas: 3
    raft:
      enabled: true
      setNodeId: true

      config: |
        ui = true

        api_addr = "https://vault1.demo.cloudnativeapps.cloud:8200"
        cluster_addr = "https://vault1.demo.cloudnativeapps.cloud:8201"
        cluster_name = "vault-cluster-1"

        listener "tcp" {
          address = "[::]:8200"
          cluster_address = "[::]:8201"
          tls_cert_file = "/vault/userconfig/tls-server/tls.crt"
          tls_key_file = "/vault/userconfig/tls-server/tls.key"
        }

        service_registration "kubernetes" {}

        storage "raft" {
          path = "/vault/data"

          retry_join {
            auto_join = "provider=k8s label_selector=\"app.kubernetes.io/name=vault,component=server\" namespace=\"{{ .Release.Namespace }}\""
            leader_tls_servername = "vault"
            leader_ca_cert_file = "/vault/userconfig/tls-ca/ca.crt"
            leader_client_key_file = "/vault/userconfig/tls-server/tls.key"
            leader_client_cert_file = "/vault/userconfig/tls-server/tls.crt"
            auto_join_scheme = "https"
          }
        }

ui:
  enabled: true
  serviceType: LoadBalancer
  annotations:
    external-dns.alpha.kubernetes.io/hostname: vault1.demo.cloudnativeapps.cloud
Let’s go over the configuration:
- The
global.tlsDisablesetting is set tofalseto enable TLS communication between the Vault pods. - The
server.image.repositoryandserver.image.tagsettings specify the Enterprise Vault container image. - The
server.service.enabledsetting is set totrueto create a LoadBalancer service for the Vault pods. - The
server.enterpriseLicense.secretNamesetting specifies the name of the secret containing the Vault license. - The
server.volumesandserver.volumeMountssettings specify the volumes and volume mounts containing the TLS certificates and keys for the Vault pods. - The
server.extraEnvironmentVarssetting specifies the environment variables for the Vault pods. In this case, theVAULT_CACERTenvironment variable is set to the path of the CA certificate in the TLS CA secret. - The
server.standalone.enabledsetting is set tofalseto disable the standalone mode. - The
server.ha.enabledsetting is set totrueto enable the high availability (HA) mode. - The
server.ha.raft.enabledsetting is set totrueto enable the Raft-based HA mode. - The
server.ha.raft.configsetting specifies the Raft configuration for the Vault cluster. This configuration includes the API address, cluster address, cluster name, listener settings, service registration settings, storage settings, and raft settings. Note that theservice_registration "kubernetes" {}setting is used to dynamically register the Vault pods with the appropriate services. Theretry_joinsetting is used to automatically discovery and join the Vault pods to the Raft cluster. - The
ui.enabledsetting is set totrueto enable the Vault UI. - The
ui.serviceTypesetting is set toLoadBalancerto create a LoadBalancer service for the Vault UI. - The
external-dns.alpha.kubernetes.io/hostnameannotations specify the external DNS hostname for thevault-activeandvault-uiservices.
Deploy the Vault cluster using Helm.
helm repo add hashicorp https://helm.releases.hashicorp.com
helm repo update
helm upgrade -i vault hashicorp/vault -n vault -f vault1-helm-values.yaml --create-namespace
Example output:
Release "vault" does not exist. Installing it now.
NAME: vault
LAST DEPLOYED: Tue Jan 21 19:46:43 2025
NAMESPACE: vault
STATUS: deployed
REVISION: 1
NOTES:
Thank you for installing HashiCorp Vault!

Now that you have deployed Vault, you should look over the docs on using
Vault with Kubernetes available here:

https://developer.hashicorp.com/vault/docs


Your release is named vault. To learn more about the release, try:

  $ helm status vault
  $ helm get manifest vault
After the Vault cluster is deployed, you can check the status of the Vault pods.
kubectl get pods -n vault
Example output:
NAME                                    READY   STATUS    RESTARTS   AGE
vault-0                                 0/1     Running   0          58s
vault-1                                 0/1     Running   0          58s
vault-2                                 0/1     Running   0          58s
vault-agent-injector-55dcc9fb4c-vrqfl   1/1     Running   0          58s
Next, you can check the status of the Vault services.
kubectl get svc -n vault
NAME                       TYPE           CLUSTER-IP       EXTERNAL-IP     PORT(S)                         AGE
vault                      LoadBalancer   10.104.37.27     10.100.153.52   8200:30471/TCP,8201:31074/TCP   78s
vault-active               LoadBalancer   10.103.135.96    10.100.153.53   8200:32701/TCP,8201:30792/TCP   78s
vault-agent-injector-svc   ClusterIP      10.106.174.140   <none>          443/TCP                         78s
vault-internal             ClusterIP      None             <none>          8200/TCP,8201/TCP               78s
vault-standby              LoadBalancer   10.98.57.233     10.100.153.54   8200:30978/TCP,8201:30547/TCP   78s
vault-ui                   LoadBalancer   10.96.199.209    10.100.153.51   8200:30550/TCP                  78s
Check the status of the Vault endpoints.
kubectl get endpoints -n vault
NAME                       ENDPOINTS                                                                    AGE
vault                      192.168.105.197:8201,192.168.119.173:8201,192.168.153.159:8201 + 3 more...   116s
vault-active               <none>                                                                       116s
vault-agent-injector-svc   192.168.119.138:8080                                                         116s
vault-internal             192.168.105.197:8201,192.168.119.173:8201,192.168.153.159:8201 + 3 more...   116s
vault-standby              192.168.105.197:8201,192.168.119.173:8201,192.168.153.159:8201 + 3 more...   116s
vault-ui                   192.168.105.197:8200,192.168.119.173:8200,192.168.153.159:8200               116s
Important clarification: the vault-active service is the one that is used for the replication between the Vault clusters, through port 8201. At this point, it has no endpoints because Vault is not initialized/ready yet. Since we specified service_registration "kubernetes" {} in our configuration, the active Vault leader pod will automatically register with the vault-active service.
Initialize the Vault cluster and save the keys to a file.
kubectl exec vault-0 -n vault -- vault operator init -address=https://127.0.0.1:8200 -format=json > vault1-keys.json
Example of the vault1-keys.json file:
{
  "unseal_keys_b64": [
    "EctDw/0Ro4mwGgAm1gIcqY1pIs09cR0G3AwxC7COVF1e",
    "aErCSkiFJtR7gWlwdhA0dD4dIyIueOZ8alamXzjR67hc",
    "gnF1c0L+UnywUQMWP/Cl803wVcITUAvGxq576L4cUqkk",
    "bo8JizwoT0pa5MBQduCixve9hmIi3wWHQcpUeEk0MYjj",
    "p4Ba6NXFNY7rruBUxczg9loPRzE/O9VkU3pCLiHmDJqR"
  ],
  "unseal_keys_hex": [
    "11cb43c3fd11a389b01a0026d6021ca98d6922cd3d711d06dc0c310bb08e545d5e",
    "684ac24a488526d47b816970761034743e1d23222e78e67c6a56a65f38d1ebb85c",
    "8271757342fe527cb05103163ff0a5f34df055c213500bc6c6ae7be8be1c52a924",
    "6e8f098b3c284f4a5ae4c05076e0a2c6f7bd866222df058741ca547849343188e3",
    "a7805ae8d5c5358eebaee054c5cce0f65a0f47313f3bd564537a422e21e60c9a91"
  ],
  "unseal_shares": 5,
  "unseal_threshold": 3,
  "recovery_keys_b64": [],
  "recovery_keys_hex": [],
  "recovery_keys_shares": 0,
  "recovery_keys_threshold": 0,
  "root_token": "hvs.SwiysCn5JTEZj79ng3cZ3TiT"
}
Note: in a real-world scenario, please keep the keys and tokens in a secure location after completing the deployment process.
Retrieve the Vault primary API hostname. Here I’m extracting the hostname from the vault-ui service annotations, since External DNS is used. If you are not using External DNS, simply set the VAULT_ADDR environment variable manually, pointing to your Vault hostname.
VAULT_PRIMARY_API_HOSTNAME=$(kubectl get service vault-ui -n vault -o jsonpath='{.metadata.annotations.external-dns\.alpha\.kubernetes\.io/hostname}')
echo "VAULT_PRIMARY_API_HOSTNAME: $VAULT_PRIMARY_API_HOSTNAME"

export VAULT_ADDR="https://$VAULT_PRIMARY_API_HOSTNAME:8200"
echo "VAULT_ADDR: $VAULT_ADDR"
Example output:
VAULT_PRIMARY_API_HOSTNAME: vault1.demo.cloudnativeapps.cloud
VAULT_ADDR: https://vault1.demo.cloudnativeapps.cloud:8200
Check the status of the Vault cluster. It should be initialized and sealed.
vault status
Key                Value
---                -----
Seal Type          shamir
Initialized        false
Sealed             true
Total Shares       0
Threshold          0
Unseal Progress    0/0
Unseal Nonce       n/a
Version            1.18.3+ent
Build Date         2024-12-16T14:09:39Z
Storage Type       raft
HA Enabled         true
Set the Vault root token. from the vault1-keys.json file.
export VAULT_TOKEN=$(jq -r '.root_token' vault1-keys.json)
Unseal the Vault cluster. Here I’m unsealing the Vault cluster using the keys from the vault1-keys.json file.
for i in {0..2}; do
  jq -r '.unseal_keys_b64[]' vault1-keys.json | head -n 3 | while read key; do
    kubectl exec vault-${i} -n vault -- vault operator unseal -address=https://127.0.0.1:8200 "$key"
  done
  if [ $i -eq 0 ]; then
    sleep 5
  fi
done
Example output:
Key                Value
---                -----
Seal Type          shamir
Initialized        true
Sealed             true
Total Shares       5
Threshold          3
Unseal Progress    1/3
Unseal Nonce       cf4ab584-5871-f939-aa17-487093949409
Version            1.18.3+ent
Build Date         2024-12-16T14:09:39Z
Storage Type       raft
HA Enabled         true
Key                Value
---                -----
Seal Type          shamir
Initialized        true
Sealed             true
Total Shares       5
Threshold          3
Unseal Progress    2/3
Unseal Nonce       cf4ab584-5871-f939-aa17-487093949409
Version            1.18.3+ent
Build Date         2024-12-16T14:09:39Z
Storage Type       raft
HA Enabled         true
Key                     Value
---                     -----
Seal Type               shamir
Initialized             true
Sealed                  false
Total Shares            5
Threshold               3
Version                 1.18.3+ent
Build Date              2024-12-16T14:09:39Z
Storage Type            raft
Cluster Name            vault-cluster-1
Cluster ID              269bd6f2-5628-e79e-a93c-e1297065e9b2
HA Enabled              true
HA Cluster              https://vault-0.vault-internal:8201
HA Mode                 active
Active Since            2025-01-21T19:59:13.361541462Z
Raft Committed Index    62
Raft Applied Index      62
Last WAL                25
...
Check the status of the Vault cluster again. It should now be unsealed.
vault status
Example output:
Key                                    Value
---                                    -----
Seal Type                              shamir
Initialized                            true
Sealed                                 false
Total Shares                           5
Threshold                              3
Version                                1.18.3+ent
Build Date                             2024-12-16T14:09:39Z
Storage Type                           raft
Cluster Name                           vault-cluster-1
Cluster ID                             269bd6f2-5628-e79e-a93c-e1297065e9b2
HA Enabled                             true
HA Cluster                             https://vault-0.vault-internal:8201
HA Mode                                standby
Active Node Address                    https://192.168.105.197:8200
Performance Standby Node               true
Performance Standby Last Remote WAL    1837
Raft Committed Index                   4768
Raft Applied Index                     4768
Check the status of the Vault Raft peers. vault-0 should be the leader and vault-1 and vault-2 should be followers.
vault operator raft list-peers
Example output:
Node       Address                        State       Voter
----       -------                        -----       -----
vault-0    vault-0.vault-internal:8201    leader      true
vault-1    vault-1.vault-internal:8201    follower    true
vault-2    vault-2.vault-internal:8201    follower    true
Check the status of the Vault pods. They should all be running.
kubectl get pods -n vault
Example output:
NAME                                    READY   STATUS    RESTARTS   AGE
vault-0                                 1/1     Running   0          13m
vault-1                                 1/1     Running   0          13m
vault-2                                 1/1     Running   0          13m
vault-agent-injector-55dcc9fb4c-vrqfl   1/1     Running   0          13m
Check the status of the Vault endpoints. The vault endpoint should list all 3 pods, and the vault-active endpoint should only list the vault-0, as that’s the leader.
kubectl get endpoints -n vault
Example output:
NAME                       ENDPOINTS                                                                    AGE
vault                      192.168.105.197:8201,192.168.119.173:8201,192.168.153.159:8201 + 3 more...   16m
vault-active               192.168.105.197:8201,192.168.105.197:8200                                    16m
vault-agent-injector-svc   192.168.119.138:8080                                                         16m
vault-internal             192.168.105.197:8201,192.168.119.173:8201,192.168.153.159:8201 + 3 more...   16m
vault-standby              192.168.119.173:8201,192.168.153.159:8201,192.168.119.173:8200 + 1 more...   16m
vault-ui                   192.168.105.197:8200,192.168.119.173:8200,192.168.153.159:8200               16m
Check the status of the Vault pods labeled as active. The vault-0 pod should have the vault-active=true label. You can also see that the IP address of the pod matches the IP listed in the vault-active endpoint (e.g., 192.168.105.197).
kubectl get pods -n vault --show-labels -l vault-active=true -o wide
Example output:
NAME      READY   STATUS    RESTARTS   AGE   IP                NODE                                                    NOMINATED NODE   READINESS GATES   LABELS
vault-0   1/1     Running   0          17m   192.168.105.197   it-spc-cls-tsl-01-worker-demo-cluster-898bd47cb-tlv59   <none>           <none>            app.kubernetes.io/instance=vault,app.kubernetes.io/name=vault,apps.kubernetes.io/pod-index=0,component=server,controller-revision-hash=vault-74c49d7b87,helm.sh/chart=vault-0.29.1,statefulset.kubernetes.io/pod-name=vault-0,vault-active=true,vault-initialized=true,vault-perf-standby=false,vault-sealed=false,vault-version=1.18.3-ent
You can also access the Vault UI from a web browser and login using the root token.

Configure Userpass Auth Method on Primary Vault
Before enabling performance replication between the Vault clusters, let’s enable the userpass auth method and create a superuser policy.
This will ensure that we can authenticate to both Vault clusters using the same username and password after enabling performance replication.
After enabling performance replication, you will no longer be able to authenticate to the secondary Vault cluster using the root token, so this is a good step to take before enabling performance replication.
Use the superuser-policy.hcl file to create a superuser policy.
vault policy write superuser-policy superuser-policy.hcl
Success! Uploaded policy: superuser-policy
Enable the userpass auth method and create a superuser user.
vault auth enable userpass
vault write auth/userpass/users/superuser password="HashiCorp1!" policies="superuser-policy"
Example output:
Success! Enabled userpass auth method at: userpass/
Success! Data written to: auth/userpass/users/superuser
Login to the Vault cluster using the superuser user.
vault login -method=userpass username=superuser password=HashiCorp1!
Example output:
Success! You are now authenticated. The token information displayed below
is already stored in the token helper. You do NOT need to run "vault login"
again. Future Vault requests will automatically use this token.

Key                    Value
---                    -----
token                  hvs.CAESIOSsNpmdarRq8dW9dLcVZr2Qmo9Z7XjV4dz7qTQnCFNiGiIKHGh2cy5uOThrUXZ6SHl6VmM1SzRIeDBacktsZTQQ06Qv
token_accessor         ChR64IDocssz4YAhP0EoEHqT
token_duration         768h
token_renewable        true
token_policies         ["default" "superuser-policy"]
identity_policies      []
policies               ["default" "superuser-policy"]
token_meta_username    superuser
Create KV Secrets on Primary Vault
Let’s create some sample secrets on the primary Vault cluster, which will be replicated to the secondary Vault cluster after enabling performance replication.
Enable the kv-v2 secrets engine on the replicated-kv path.
vault secrets enable -path=replicated-kv kv-v2
Example output:
Success! Enabled the kv-v2 secrets engine at: replicated-kv/
Create a secret on the replicated-kv path.
vault kv put replicated-kv/my-replicated-secret value=my-replicated-P@ssw0rd
Example output:
============= Secret Path =============
replicated-kv/data/my-replicated-secret

======= Metadata =======
Key                Value
---                -----
created_time       2025-01-21T20:40:21.878122188Z
custom_metadata    <nil>
deletion_time      n/a
destroyed          false
version            1
Let’s also create a local secrets engine on the primary Vault cluster. The secrets under it will not be replicated to the secondary Vault cluster.
Enable the kv-v2 secrets engine on the local-kv path.
vault secrets enable -path=local-kv -local kv-v2
Example output:
Success! Enabled the kv-v2 secrets engine at: local-kv/
Create a secret on the local-kv path.
vault kv put local-kv/my-local-secret value=my-local-P@ssw0rd
Example output:
======== Secret Path ========
local-kv/data/my-local-secret

======= Metadata =======
Key                Value
---                -----
created_time       2025-01-21T20:41:12.052067315Z
custom_metadata    <nil>
deletion_time      n/a
destroyed          false
version            1
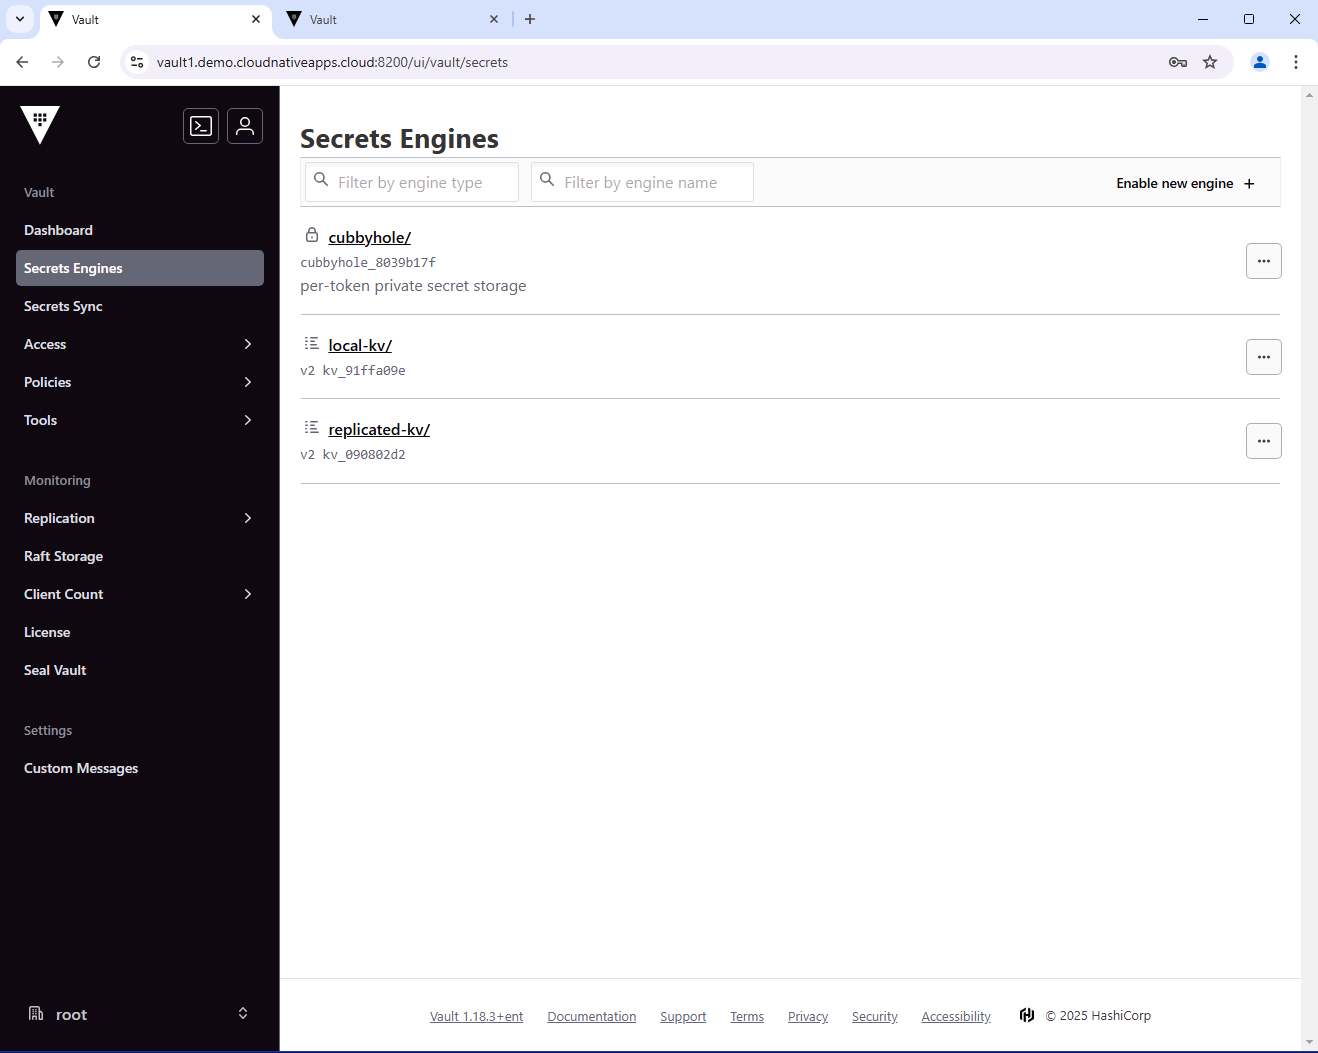
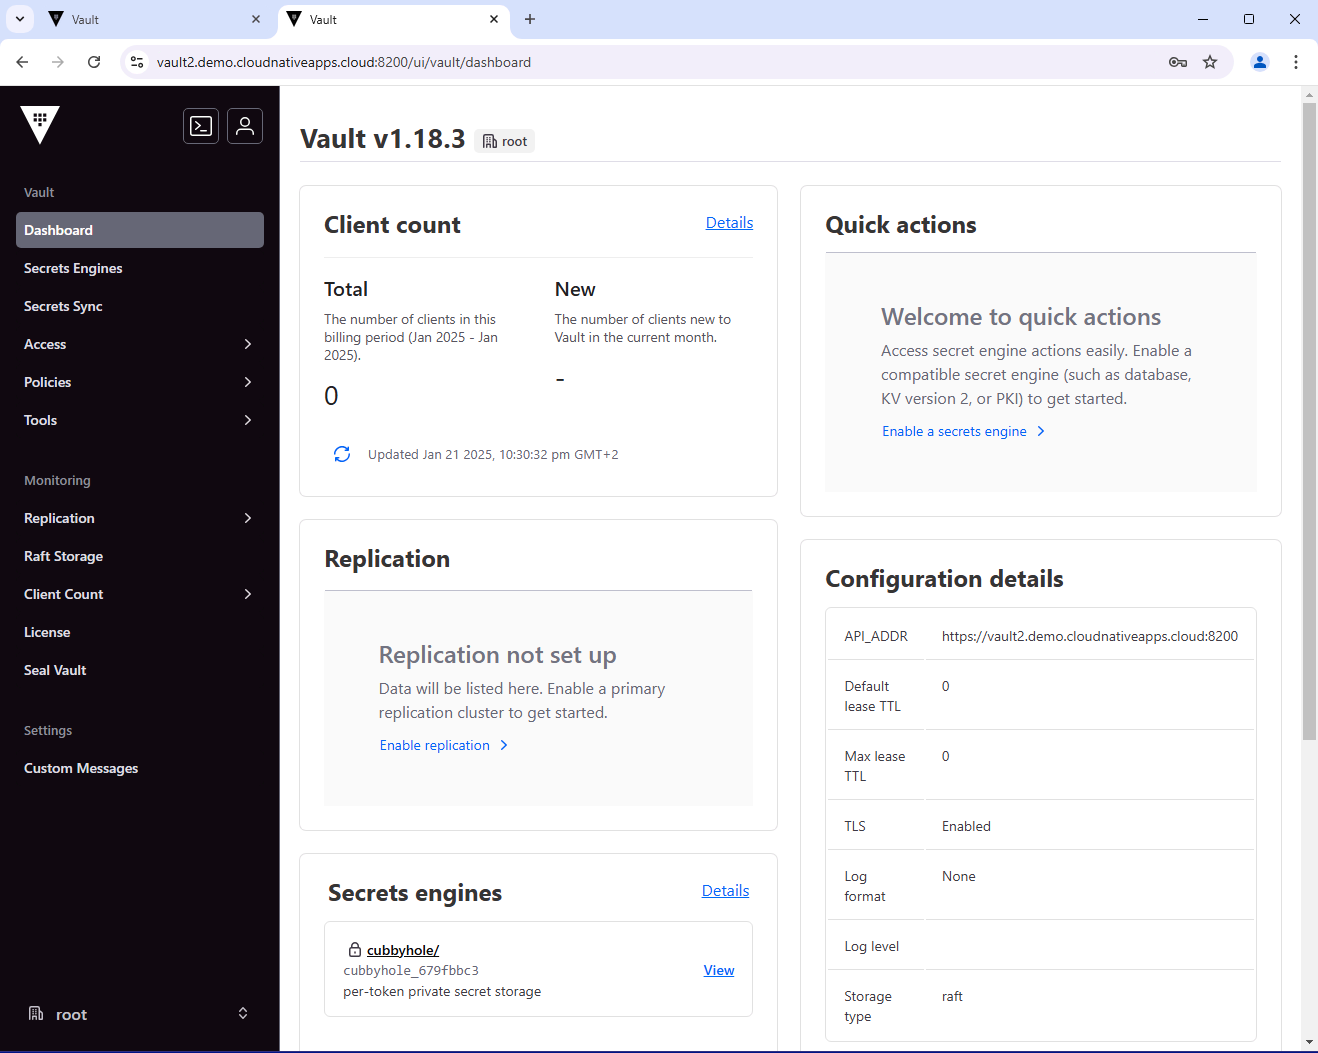
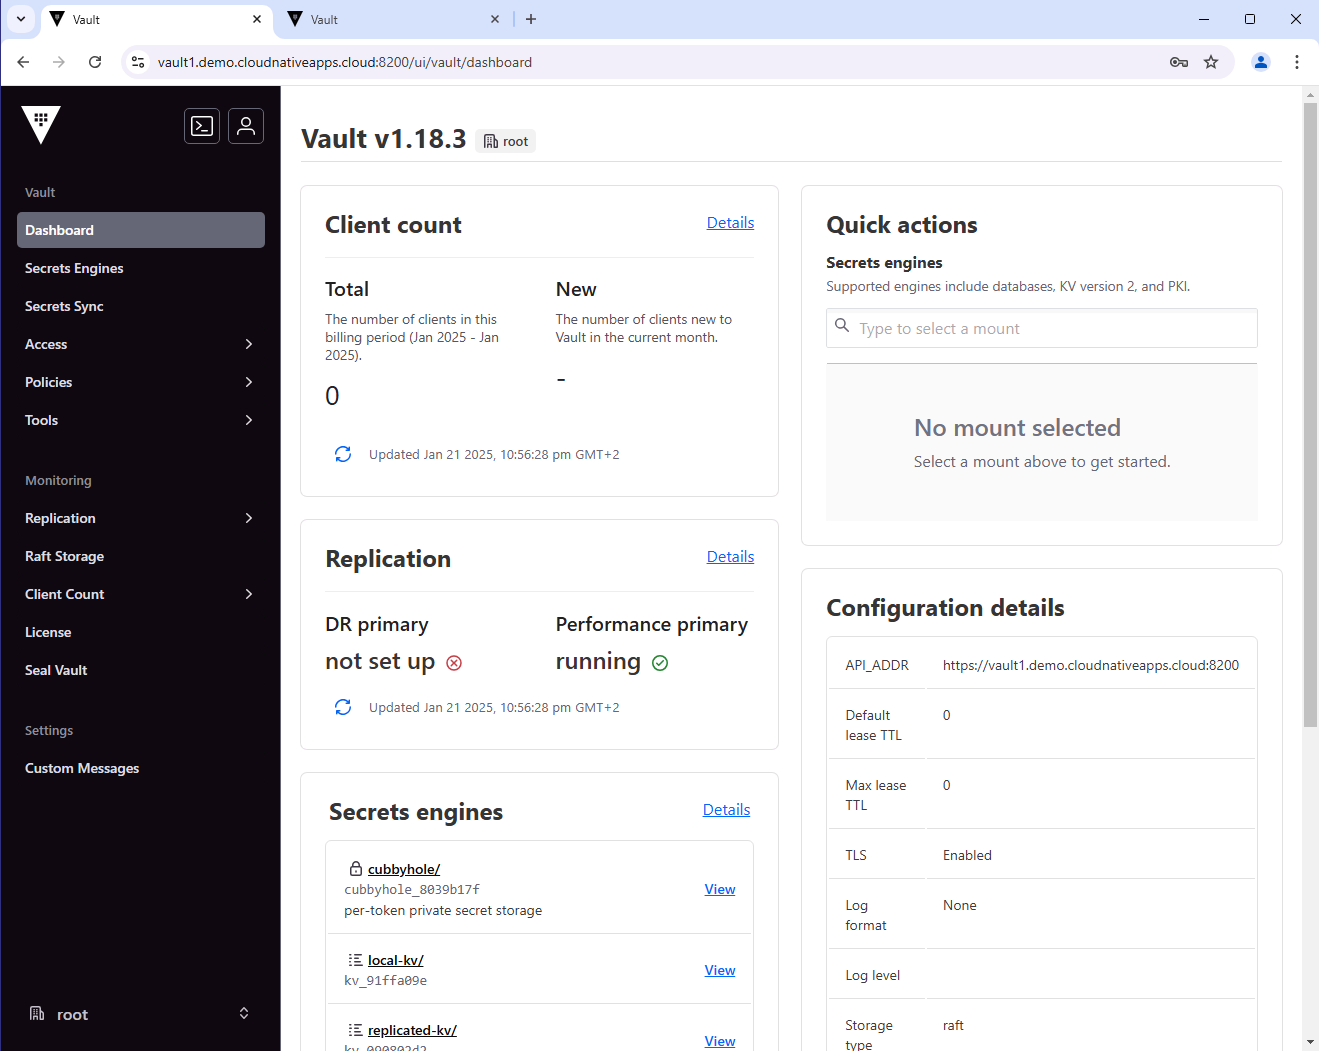
From the Vault UI, you can also see the enabled secrets engines.
Secondary Vault Cluster Deployment
The deployment of the secondary Vault cluster is identical to the primary Vault cluster.
Switch to the context of the Kubernetes cluster where you want to deploy the Vault secondary cluster.
kubectl config use-context <context-name>
Set your Vault license file in the vault-license.yaml file, and the TLS certificate, key and CA in the vault-tls-certs.yaml file.
Then, apply the TLS certificates and the Vault license.
kubectl apply -f vault-tls-certs.yaml
kubectl apply -f vault-license.yaml
Example output:
namespace/vault created
secret/tls-server created
secret/tls-ca created
secret/vault-lic created
helm repo add hashicorp https://helm.releases.hashicorp.com
helm repo update
helm upgrade -i vault hashicorp/vault -n vault -f vault2-helm-values.yaml --create-namespace
Example output:
Release "vault" does not exist. Installing it now.
NAME: vault
LAST DEPLOYED: Tue Jan 21 20:19:24 2025
NAMESPACE: vault
STATUS: deployed
REVISION: 1
NOTES:
Thank you for installing HashiCorp Vault!

Now that you have deployed Vault, you should look over the docs on using
Vault with Kubernetes available here:

https://developer.hashicorp.com/vault/docs


Your release is named vault. To learn more about the release, try:

  $ helm status vault
  $ helm get manifest vault
Check the status of the Vault pods. They should all be running.
kubectl get pods -n vault
Example output:
NAME                                    READY   STATUS    RESTARTS   AGE
vault-0                                 0/1     Running   0          28s
vault-1                                 0/1     Running   0          28s
vault-2                                 0/1     Running   0          28s
vault-agent-injector-55dcc9fb4c-qg6w9   1/1     Running   0          28s
Check the status of the Vault endpoints. The vault endpoint should list all 3 pods, and the vault-active endpoint should only list the vault-0, as that’s the leader.
kubectl get svc -n vault
NAME                       TYPE           CLUSTER-IP       EXTERNAL-IP     PORT(S)                         AGE
vault                      LoadBalancer   10.105.134.127   10.100.153.73   8200:31144/TCP,8201:30876/TCP   36s
vault-active               LoadBalancer   10.96.1.235      10.100.153.72   8200:30093/TCP,8201:31993/TCP   36s
vault-agent-injector-svc   ClusterIP      10.105.29.126    <none>          443/TCP                         36s
vault-internal             ClusterIP      None             <none>          8200/TCP,8201/TCP               36s
vault-standby              LoadBalancer   10.109.60.30     10.100.153.74   8200:30747/TCP,8201:32135/TCP   36s
vault-ui                   LoadBalancer   10.98.109.130    10.100.153.71   8200:31167/TCP                  36s
Check the status of the Vault endpoints. The vault endpoint should list all 3 pods, and the vault-active endpoint should only list the vault-0, as that’s the leader.
kubectl get endpoints -n vault
Example output:
NAME                       ENDPOINTS                                                                AGE
vault                      192.168.54.159:8201,192.168.60.59:8201,192.168.84.253:8201 + 3 more...   46s
vault-active               <none>                                                                   46s
vault-agent-injector-svc   192.168.60.30:8080                                                       46s
vault-internal             192.168.54.159:8201,192.168.60.59:8201,192.168.84.253:8201 + 3 more...   46s
vault-standby              192.168.54.159:8201,192.168.60.59:8201,192.168.84.253:8201 + 3 more...   46s
vault-ui                   192.168.54.159:8200,192.168.60.59:8200,192.168.84.253:8200               46s
kubectl exec vault-0 -n vault -- vault operator init -address=https://127.0.0.1:8200 -format=json > vault2-keys.json
Example of the vault2-keys.json file:
{
  "unseal_keys_b64": [
    "YeLsFBoQC0DA5HFBD9MY96BlQoBPR9YQZsNXgRaAS0sB",
    "wQQLJDXB+v4kac4pJceXBVid0CJdOBgv0TlLSsP1xqNg",
    "7V+JGddHrQM2Ig17EwWD6W62OUS7a2ykU5RDLFkQ+WQ5",
    "3LSZ3QBhHePCyRp58AIHoz+v49YGaSRmpjwG5z6lKS8V",
    "a/wgnShD+Ej/HesLIxf/VxN7+7gwVLj2kA+le2iaMHw3"
  ],
  "unseal_keys_hex": [
    "61e2ec141a100b40c0e471410fd318f7a06542804f47d61066c3578116804b4b01",
    "c1040b2435c1fafe2469ce2925c79705589dd0225d38182fd1394b4ac3f5c6a360",
    "ed5f8919d747ad0336220d7b130583e96eb63944bb6b6ca45394432c5910f96439",
    "dcb499dd00611de3c2c91a79f00207a33fafe3d606692466a63c06e73ea5292f15",
    "6bfc209d2843f848ff1deb0b2317ff57137bfbb83054b8f6900fa57b689a307c37"
  ],
  "unseal_shares": 5,
  "unseal_threshold": 3,
  "recovery_keys_b64": [],
  "recovery_keys_hex": [],
  "recovery_keys_shares": 0,
  "recovery_keys_threshold": 0,
  "root_token": "hvs.4na1qAYkqqvDHQlm8Hytlibe"
}
Note: in a real-world scenario, please keep the keys and tokens in a secure location after completing the deployment process.
Retrieve the Vault primary API hostname. Here I’m extracting the hostname from the vault-ui service annotations, since External DNS is used. If you are not using External DNS, simply set the VAULT_ADDR environment variable manually, pointing to your Vault hostname.
VAULT_SECONDARY_API_HOSTNAME=$(kubectl get service vault-ui -n vault -o jsonpath='{.metadata.annotations.external-dns\.alpha\.kubernetes\.io/hostname}')
echo "VAULT_SECONDARY_API_HOSTNAME: $VAULT_SECONDARY_API_HOSTNAME"

export VAULT_ADDR="https://$VAULT_SECONDARY_API_HOSTNAME:8200"
echo "VAULT_ADDR: $VAULT_ADDR"
Example output:
VAULT_SECONDARY_API_HOSTNAME: vault2.demo.cloudnativeapps.cloud
VAULT_ADDR: https://vault2.demo.cloudnativeapps.cloud:8200
Check the status of the Vault cluster. It should be initialized and sealed.
vault status
Example output:
Key                Value
---                -----
Seal Type          shamir
Initialized        false
Sealed             true
Total Shares       0
Threshold          0
Unseal Progress    0/0
Unseal Nonce       n/a
Version            1.18.3+ent
Build Date         2024-12-16T14:09:39Z
Storage Type       raft
HA Enabled         true
Set the Vault root token. from the vault2-keys.json file.
export VAULT_TOKEN=$(jq -r '.root_token' vault2-keys.json)
Unseal the Vault cluster. Here I’m unsealing the Vault cluster using the keys from the vault2-keys.json file.
for i in {0..2}; do
  jq -r '.unseal_keys_b64[]' vault2-keys.json | head -n 3 | while read key; do
    kubectl exec vault-${i} -n vault -- vault operator unseal -address=https://127.0.0.1:8200 "$key"
  done
  if [ $i -eq 0 ]; then
    sleep 5
  fi
done
Example output:
Key                Value
---                -----
Seal Type          shamir
Initialized        true
Sealed             true
Total Shares       5
Threshold          3
Unseal Progress    1/3
Unseal Nonce       852a7cf8-4aaf-0454-126f-f180f19bd023
Version            1.18.3+ent
Build Date         2024-12-16T14:09:39Z
Storage Type       raft
HA Enabled         true
Key                Value
---                -----
Seal Type          shamir
Initialized        true
Sealed             true
Total Shares       5
Threshold          3
Unseal Progress    2/3
Unseal Nonce       852a7cf8-4aaf-0454-126f-f180f19bd023
Version            1.18.3+ent
Build Date         2024-12-16T14:09:39Z
Storage Type       raft
HA Enabled         true
Key                     Value
---                     -----
Seal Type               shamir
Initialized             true
Sealed                  false
Total Shares            5
Threshold               3
Version                 1.18.3+ent
Build Date              2024-12-16T14:09:39Z
Storage Type            raft
Cluster Name            vault-cluster-2
Cluster ID              a6d87090-ba41-39d8-5b39-0ae39c9d3f77
HA Enabled              true
HA Cluster              https://vault-0.vault-internal:8201
HA Mode                 active
Active Since            2025-01-21T20:25:57.959456904Z
Raft Committed Index    63
Raft Applied Index      63
Last WAL                25
...
Check the status of the Vault cluster again. It should now be unsealed.
vault status
Example output:
Key                                    Value
---                                    -----
Seal Type                              shamir
Initialized                            true
Sealed                                 false
Total Shares                           5
Threshold                              3
Version                                1.18.3+ent
Build Date                             2024-12-16T14:09:39Z
Storage Type                           raft
Cluster Name                           vault-cluster-2
Cluster ID                             a6d87090-ba41-39d8-5b39-0ae39c9d3f77
HA Enabled                             true
HA Cluster                             https://vault-0.vault-internal:8201
HA Mode                                standby
Active Node Address                    https://192.168.60.58:8200
Performance Standby Node               true
Performance Standby Last Remote WAL    122
Raft Committed Index                   319
Raft Applied Index                     318
Check the status of the Vault Raft peers. vault-0 should be the leader and vault-1 and vault-2 should be followers.
vault operator raft list-peers
Example output:
Node       Address                        State       Voter
----       -------                        -----       -----
vault-0    vault-0.vault-internal:8201    leader      true
vault-1    vault-1.vault-internal:8201    follower    true
vault-2    vault-2.vault-internal:8201    follower    true
Check the status of the Vault pods. They should all be running.
kubectl get pods -n vault
NAME                                    READY   STATUS    RESTARTS   AGE
vault-0                                 1/1     Running   0          3m52s
vault-1                                 1/1     Running   0          3m52s
vault-2                                 1/1     Running   0          3m52s
vault-agent-injector-55dcc9fb4c-9r96n   1/1     Running   0          3m52s
Check the status of the Vault endpoints. The vault endpoint should list all 3 pods, and the vault-active endpoint should only list the vault-0, as that’s the leader.
kubectl get endpoints -n vault
Example output:
NAME                       ENDPOINTS                                                                 AGE
vault                      192.168.54.191:8201,192.168.60.58:8201,192.168.84.224:8201 + 3 more...    3m59s
vault-active               192.168.60.58:8201,192.168.60.58:8200                                     3m59s
vault-agent-injector-svc   192.168.60.26:8080                                                        3m59s
vault-internal             192.168.54.191:8201,192.168.60.58:8201,192.168.84.224:8201 + 3 more...    3m59s
vault-standby              192.168.54.191:8201,192.168.84.224:8201,192.168.54.191:8200 + 1 more...   3m59s
vault-ui                   192.168.54.191:8200,192.168.60.58:8200,192.168.84.224:8200                3m59s
Check the status of the Vault pod labeled as active. The vault-0 pod should have the vault-active=true label. You can also see that the IP address of the pod matches the IP listed in the vault-active endpoint (e.g., 192.168.60.58).
kubectl get pods -n vault --show-labels -l vault-active=true -o wide
NAME      READY   STATUS    RESTARTS   AGE     IP              NODE                                                     NOMINATED NODE   READINESS GATES   LABELS
vault-0   1/1     Running   0          4m10s   192.168.60.58   it-spc-cls-tsl-02-worker-demo-cluster-747f94f659-2hlnc   <none>           <none>            app.kubernetes.io/instance=vault,app.kubernetes.io/name=vault,apps.kubernetes.io/pod-index=0,component=server,controller-revision-hash=vault-74c49d7b87,helm.sh/chart=vault-0.29.1,statefulset.kubernetes.io/pod-name=vault-0,vault-active=true,vault-initialized=true,vault-perf-standby=false,vault-sealed=false,vault-version=1.18.3-ent
You can also access the Vault UI from a web browser and login using the root token.
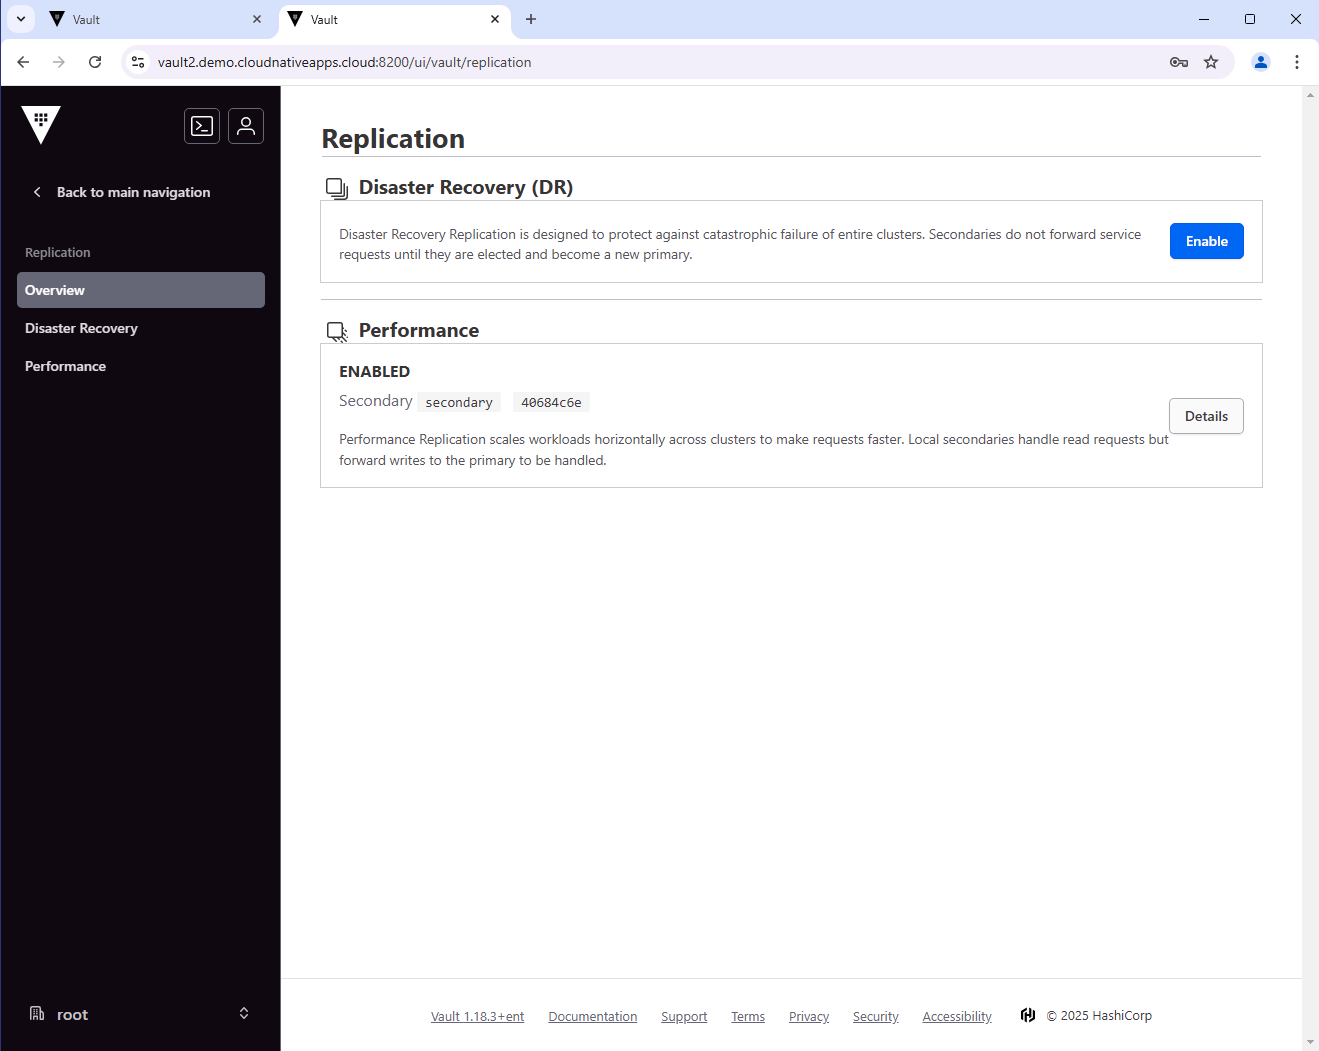
Enable Performance Replication
Enable Performance Replication on the Primary Cluster
Switch to the context of the Kubernetes cluster where the Vault primary cluster is deployed.
kubectl config use-context kubectl config use-context <context-name>
Retrieve the Vault primary API hostname. Here I’m extracting the hostname from the vault-ui service annotations, since External DNS is used. If you are not using External DNS, simply set the VAULT_ADDR environment variable manually, pointing to your Vault hostname.
VAULT_PRIMARY_API_HOSTNAME=$(kubectl get service vault-ui -n vault -o jsonpath='{.metadata.annotations.external-dns\.alpha\.kubernetes\.io/hostname}')
echo "VAULT_PRIMARY_API_HOSTNAME: $VAULT_PRIMARY_API_HOSTNAME"

export VAULT_ADDR="https://$VAULT_PRIMARY_API_HOSTNAME:8200"
echo "VAULT_ADDR: $VAULT_ADDR"

export VAULT_TOKEN=$(jq -r '.root_token' vault1-keys.json)
Example output:
VAULT_PRIMARY_API_HOSTNAME: vault1.demo.cloudnativeapps.cloud
VAULT_ADDR: https://vault1.demo.cloudnativeapps.cloud:8200
Retrieve the Vault primary active hostname. Here I’m extracting the hostname from the vault-active service annotations, since External DNS is used. If you are not using External DNS, simply set the VAULT_ADDR environment variable manually, pointing to your Vault hostname.
VAULT_PRIMARY_ACTIVE_HOSTNAME=$(kubectl get service vault-active -n vault -o jsonpath='{.metadata.annotations.external-dns\.alpha\.kubernetes\.io/hostname}')
echo "VAULT_PRIMARY_ACTIVE_HOSTNAME: $VAULT_PRIMARY_ACTIVE_HOSTNAME"
Example output:
VAULT_PRIMARY_ACTIVE_HOSTNAME: vault1-active.demo.cloudnativeapps.cloud
Enable Performance Replication on the primary cluster.
vault write -f sys/replication/performance/primary/enable \
    primary_cluster_addr="https://$VAULT_PRIMARY_ACTIVE_HOSTNAME:8201"
WARNING! The following warnings were returned from Vault:

  * This cluster is being enabled as a primary for replication. Vault will be
  unavailable for a brief period and will resume service shortly.
VAULT_SECONDARY_TOKEN=$(vault write sys/replication/performance/primary/secondary-token id="secondary" -format=json | jq -r '.wrap_info.token')
echo "VAULT_SECONDARY_TOKEN: $VAULT_SECONDARY_TOKEN"
Enable Performance Replication on the Secondary Cluster
Switch to the context of the Kubernetes cluster where the Vault secondary cluster is deployed.
kubectl config use-context <context-name>
Retrieve the Vault secondary API hostname. Here I’m extracting the hostname from the vault-ui service annotations, since External DNS is used. If you are not using External DNS, simply set the VAULT_ADDR environment variable manually, pointing to your Vault hostname.
export VAULT_SECONDARY_API_HOSTNAME=$(kubectl get service vault-ui -n vault -o jsonpath='{.metadata.annotations.external-dns\.alpha\.kubernetes\.io/hostname}')
echo "VAULT_SECONDARY_API_HOSTNAME: $VAULT_SECONDARY_API_HOSTNAME"

export VAULT_ADDR="https://$VAULT_SECONDARY_API_HOSTNAME:8200"
echo "VAULT_ADDR: $VAULT_ADDR"

export VAULT_TOKEN=$(jq -r '.root_token' vault2-keys.json)
Example output:
VAULT_SECONDARY_API_HOSTNAME: vault2.demo.cloudnativeapps.cloud
VAULT_ADDR: https://vault2.demo.cloudnativeapps.cloud:8200
Enable Performance Replication on the secondary cluster.
vault write sys/replication/performance/secondary/enable \
    token=$VAULT_SECONDARY_TOKEN \
    primary_api_addr="https://$VAULT_PRIMARY_API_HOSTNAME:8200" \
    ca_file="/vault/userconfig/tls-ca/ca.crt"
Example output:
WARNING! The following warnings were returned from Vault:

  * Vault has successfully found secondary information; it may take a while to
  perform setup tasks. Vault will be unavailable until these tasks and initial
  sync complete.
Unset the VAULT_TOKEN environment variable if it’s set.
unset VAULT_TOKEN
Check the status of the Vault cluster. It should be sealed.
vault status
Example output:
Key                Value
---                -----
Seal Type          shamir
Initialized        true
Sealed             true
Total Shares       5
Threshold          3
Unseal Progress    0/3
Unseal Nonce       n/a
Version            1.18.3+ent
Build Date         2024-12-16T14:09:39Z
Storage Type       raft
HA Enabled         true
Unseal the Vault cluster. Here I’m unsealing the Vault cluster using the keys from the vault1-keys.json file.
The Vault clusters are now sharing the same unseal keys. The keys in vault2-keys.json are irrelevant at this point and can no longer be used.
for i in {0..2}; do
  jq -r '.unseal_keys_b64[]' vault1-keys.json | head -n 3 | while read key; do
    kubectl exec vault-${i} -n vault -- vault operator unseal -address=https://127.0.0.1:8200 "$key"
  done
  if [ $i -eq 0 ]; then
    sleep 5
  fi
done
Example output:
Key                     Value
---                     -----
Seal Type               shamir
Initialized             true
Sealed                  false
Total Shares            5
Threshold               3
Version                 1.18.3+ent
Build Date              2024-12-16T14:09:39Z
Storage Type            raft
Cluster Name            vault-cluster-2
Cluster ID              a6d87090-ba41-39d8-5b39-0ae39c9d3f77
HA Enabled              true
HA Cluster              https://vault-0.vault-internal:8201
HA Mode                 active
Active Since            2025-01-21T20:48:48.471775238Z
Raft Committed Index    4220
Raft Applied Index      4219
Last WAL                113
Key                     Value
---                     -----
Seal Type               shamir
Initialized             true
Sealed                  false
Total Shares            5
Threshold               3
Version                 1.18.3+ent
Build Date              2024-12-16T14:09:39Z
Storage Type            raft
Cluster Name            vault-cluster-2
Cluster ID              a6d87090-ba41-39d8-5b39-0ae39c9d3f77
HA Enabled              true
HA Cluster              https://vault-0.vault-internal:8201
HA Mode                 active
Active Since            2025-01-21T20:48:48.471775238Z
Raft Committed Index    4221
Raft Applied Index      4221
Last WAL                114
...
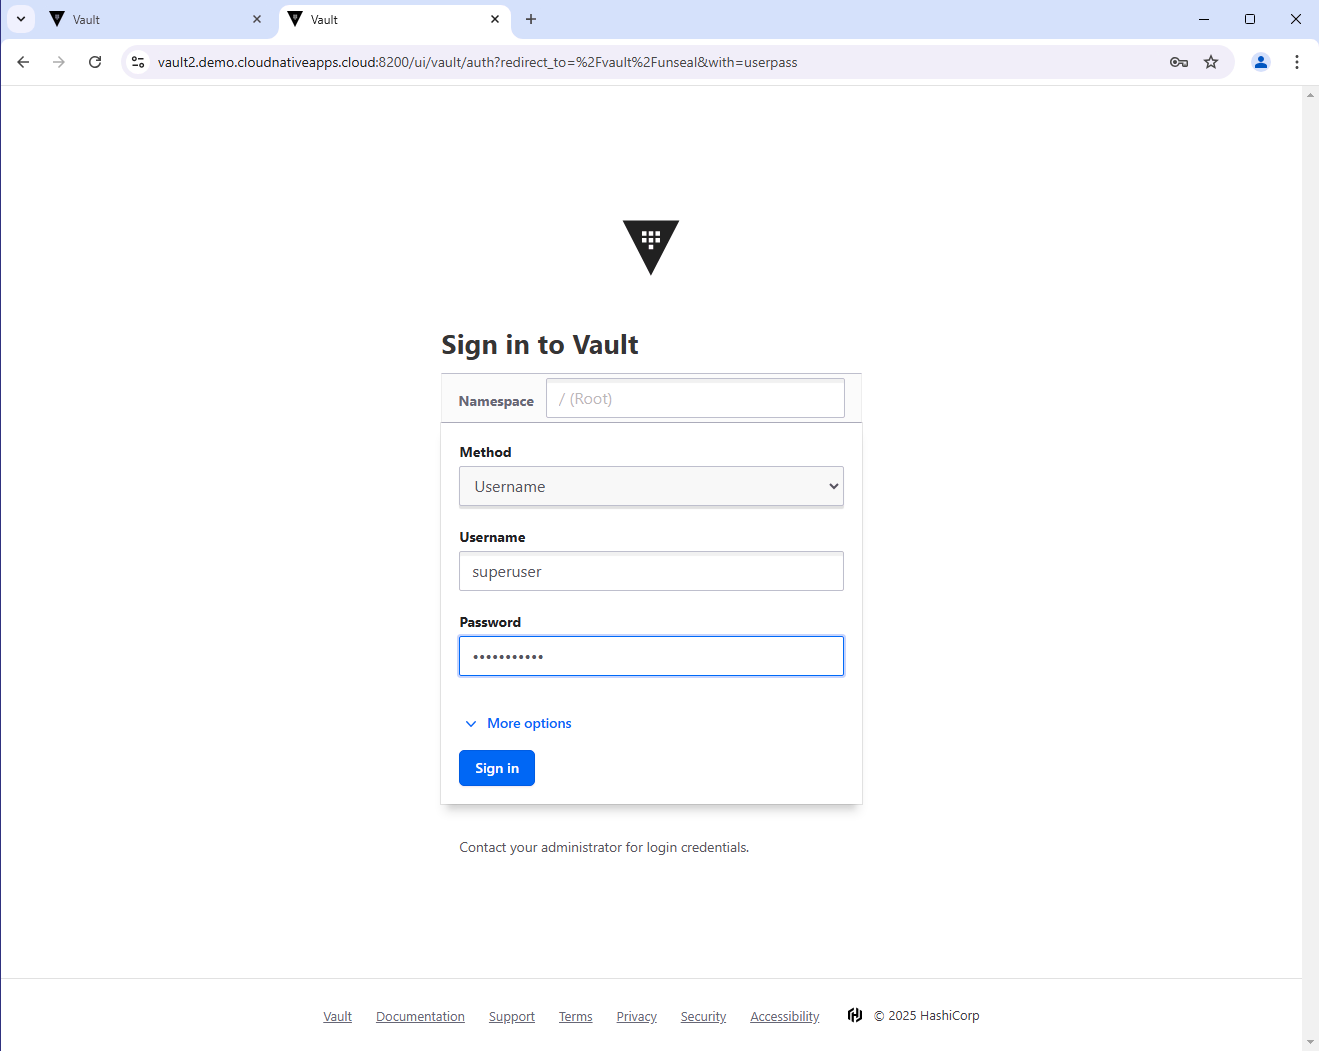
Login to the Vault cluster. Here I’m logging in as the superuser user.
vault login -method=userpass username=superuser password=HashiCorp1!
Example output:
Success! You are now authenticated. The token information displayed below
is already stored in the token helper. You do NOT need to run "vault login"
again. Future Vault requests will automatically use this token.

Key                    Value
---                    -----
token                  hvs.CAESIFgw0DKdpOp0omUT8kvzbycUtJp-B0_VLzk8mDH3LJH1GiEKHGh2cy53S2VXcUVIdUR5bW1oUFV3ZklqWk1KNW4QugM
token_accessor         AUsiovp6SVTmgchkrvQENNiX
token_duration         768h
token_renewable        true
token_policies         ["default" "superuser-policy"]
identity_policies      []
policies               ["default" "superuser-policy"]
token_meta_username    superuser
If the login is successful, that is already a good indicator that the replication is working.
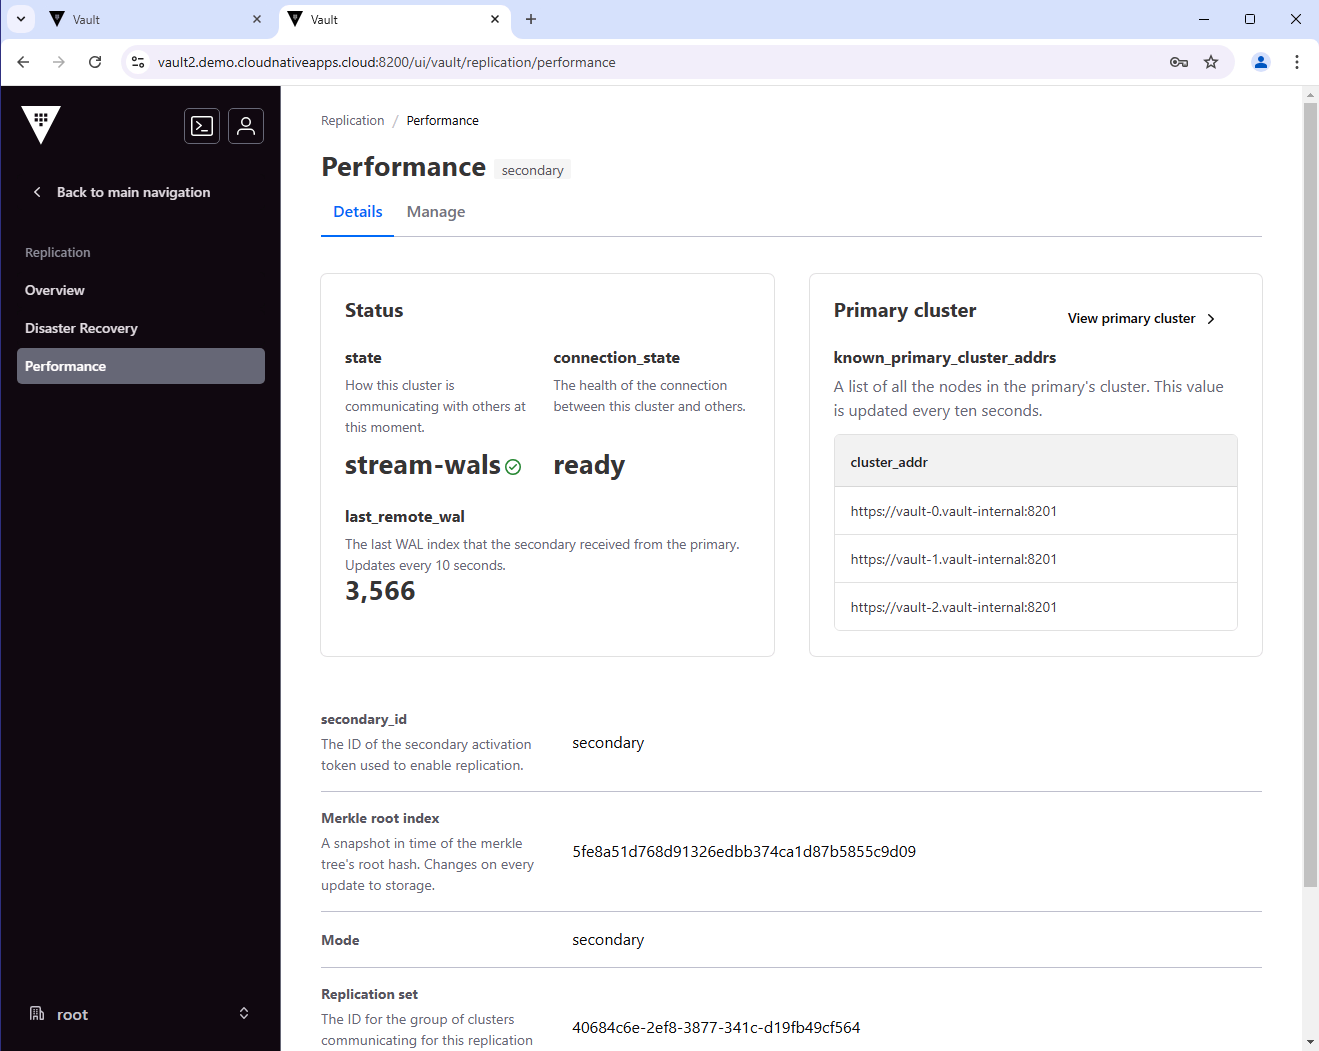
You can also check the status of the replication. The performance section should show the primary cluster address.
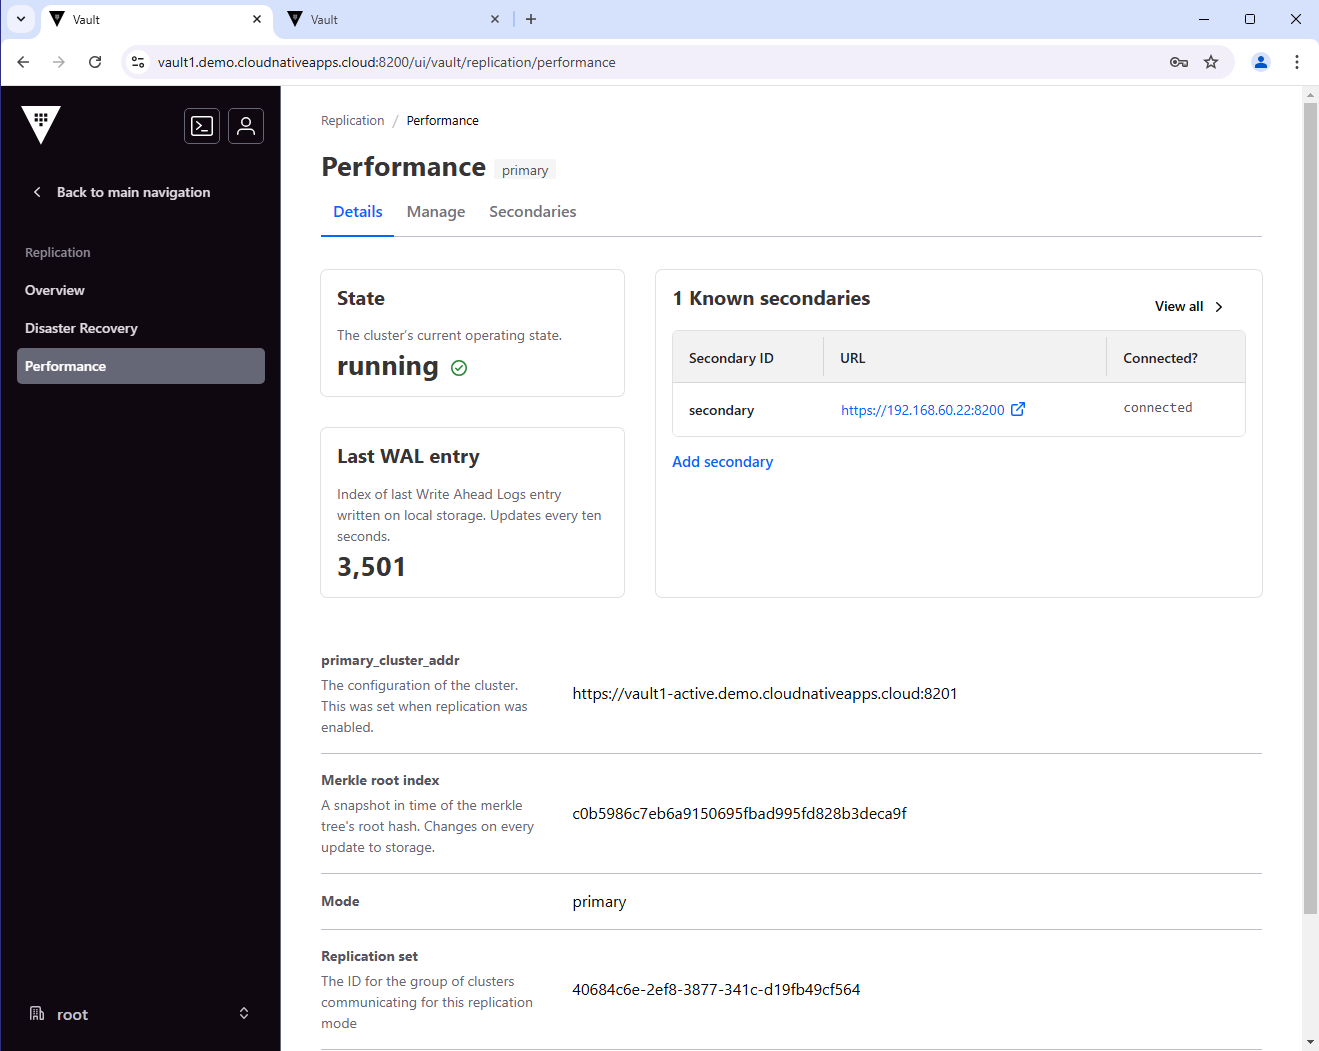
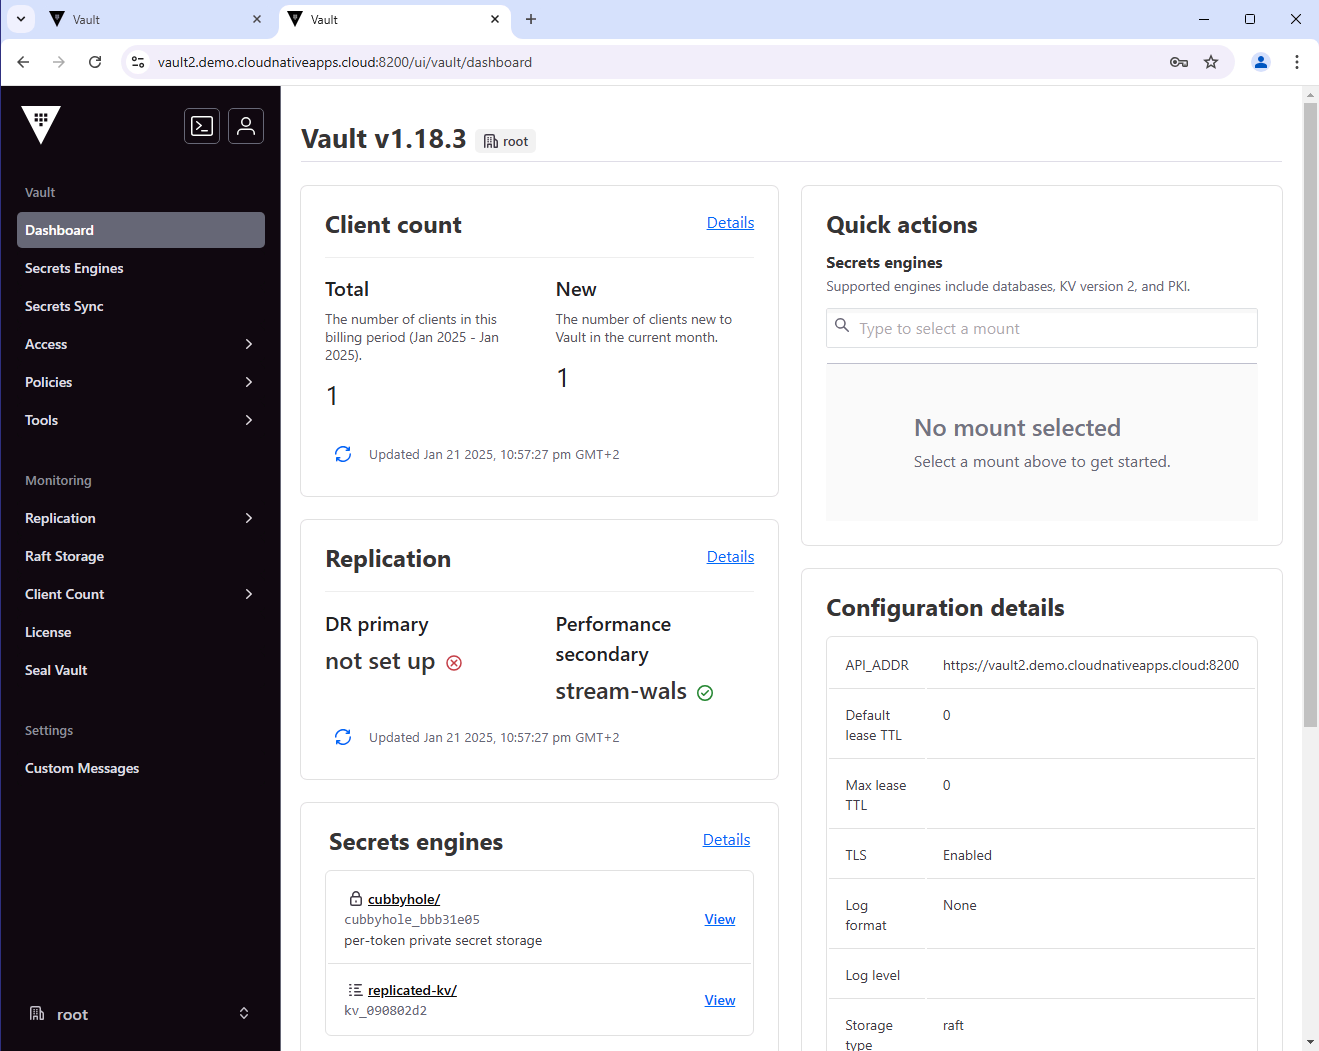
vault read -format=json sys/replication/status | jq
{
  "request_id": "3d866ebd-5ad5-978f-9def-faa969ca14b2",
  "lease_id": "",
  "lease_duration": 0,
  "renewable": false,
  "data": {
    "dr": {
      "mode": "disabled"
    },
    "performance": {
      "cluster_id": "40684c6e-2ef8-3877-341c-d19fb49cf564",
      "connection_state": "ready",
      "corrupted_merkle_tree": false,
      "known_primary_cluster_addrs": [
        "https://vault-0.vault-internal:8201",
        "https://vault-1.vault-internal:8201",
        "https://vault-2.vault-internal:8201"
      ],
      "last_corruption_check_epoch": "-62135596800",
      "last_reindex_epoch": "1737492528",
      "last_remote_wal": 3399,
      "last_start": "2025-01-21T20:54:14Z",
      "merkle_root": "28daf9702e7b5a7fadbc47914748770d0a56ef0f",
      "mode": "secondary",
      "primaries": [
        {
          "api_address": "https://192.168.105.197:8200",
          "clock_skew_ms": "0",
          "cluster_address": "https://vault-0.vault-internal:8201",
          "connection_status": "connected",
          "last_heartbeat": "2025-01-21T20:55:09Z",
          "last_heartbeat_duration_ms": "1",
          "replication_primary_canary_age_ms": "531"
        }
      ],
      "primary_cluster_addr": "https://vault1-active.demo.cloudnativeapps.cloud:8201",
      "secondary_id": "secondary",
      "ssct_generation_counter": 0,
      "state": "stream-wals"
    }
  },
  "warnings": null
}
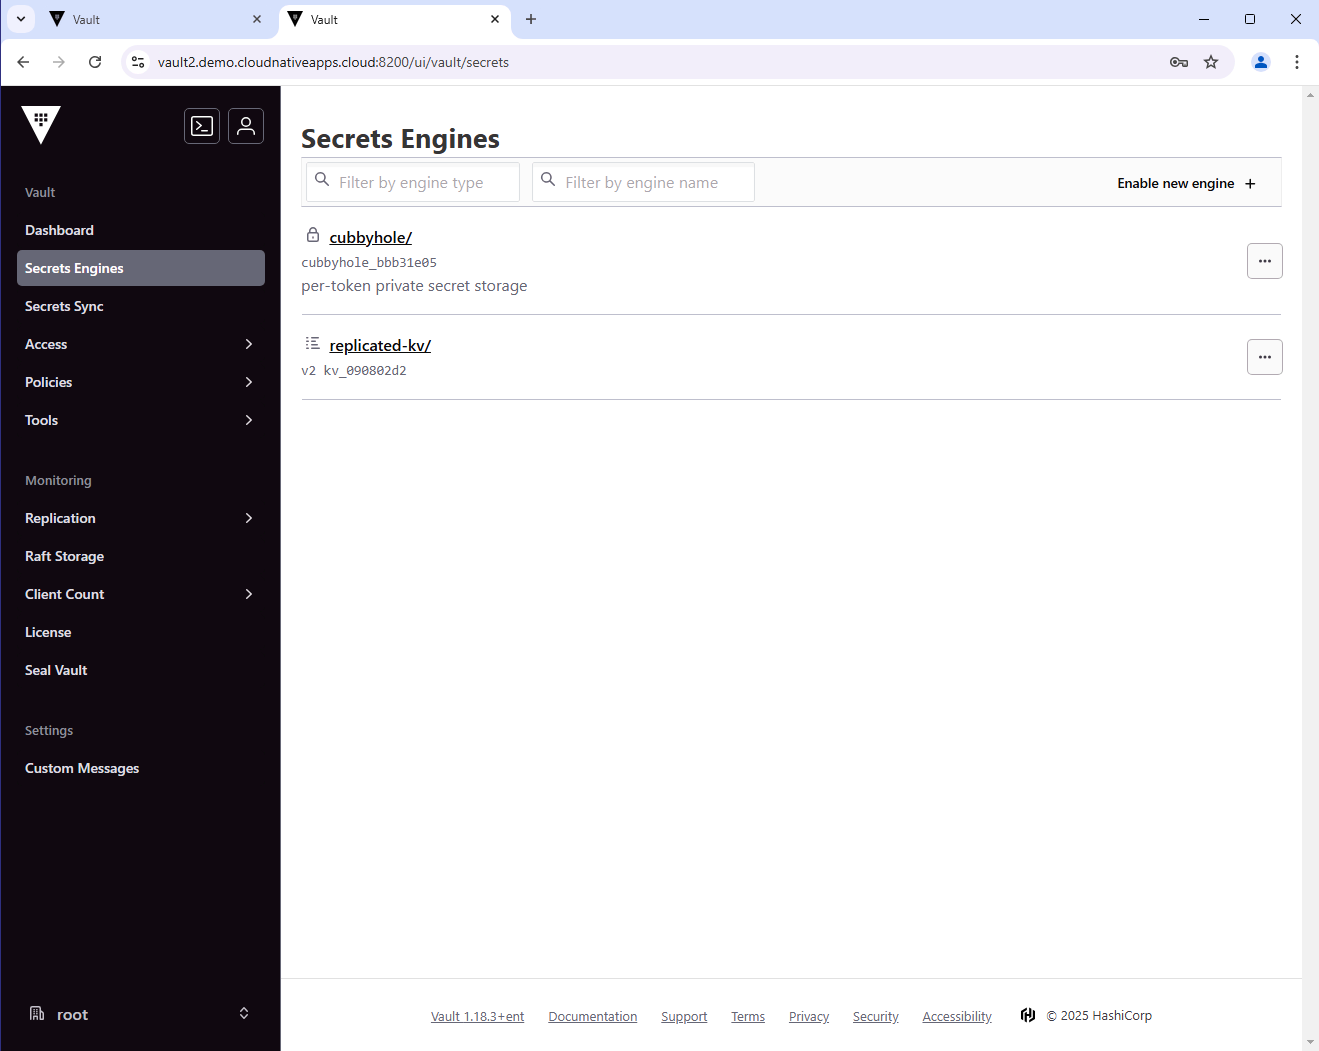
Let’s list the secrets engine in the secondary cluster. You should see the replicated-kv secrets engine, which is now replicated from the primary cluster. You should not see the local-kv secrets engine, since it is local on the primary cluster.
vault secrets list
Path              Type         Accessor              Description
----              ----         --------              -----------
cubbyhole/        cubbyhole    cubbyhole_bbb31e05    per-token private secret storage
identity/         identity     identity_f8185782     identity store
replicated-kv/    kv           kv_090802d2           n/a
sys/              system       system_fca21391       system endpoints used for control, policy and debugging
Let’s read the secret.
vault kv get replicated-kv/my-replicated-secret
Example output:
============= Secret Path =============
replicated-kv/data/my-replicated-secret

======= Metadata =======
Key                Value
---                -----
created_time       2025-01-21T20:40:21.878122188Z
custom_metadata    <nil>
deletion_time      n/a
destroyed          false
version            1

==== Data ====
Key      Value
---      -----
value    my-replicated-P@ssw0rd
As you can see, the secret was replicated from the primary cluster to the secondary cluster.
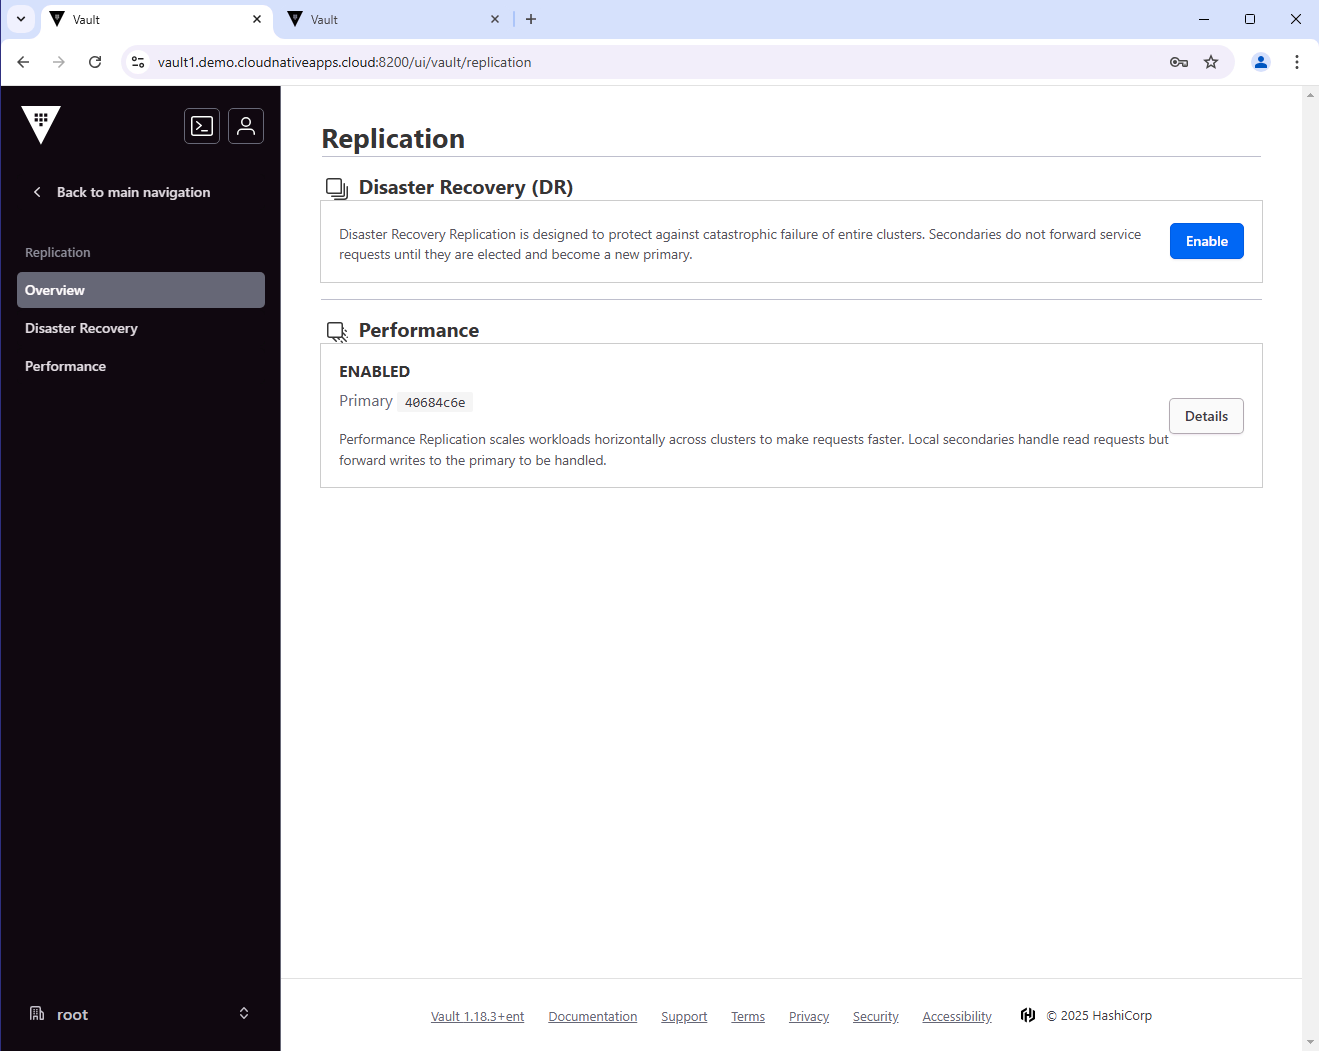
From the UI, you can also see the status of the replication.
From the primary cluster:
From the secondary cluster:
Wrap-up
This guide demonstrated how to implement HashiCorp Vault Enterprise replication in a Kubernetes environment. We covered:
- Deploying primary and secondary Vault clusters using Helm
- Configuring TLS and high availability using Raft
- Setting up performance replication between clusters
- Verifying replication status and functionality
With this setup, you can maintain synchronized Vault clusters across different locations while ensuring high availability and data locality.