
HashiCorp Vault Intermediate CA Setup with Cert-Manager and Microsoft Root CA
In this post, we’ll explore how to set up HashiCorp Vault as an Intermediate Certificate Authority (CA) on a Kubernetes cluster, using a Microsoft CA as the Root CA. We’ll then integrate this setup with cert-manager, a powerful Kubernetes add-on for automating the management and issuance of TLS certificates.
The following is an architecture diagram for the use case I’ve built.

- A Microsoft Windows server is used as the Root CA of the environment.
- A Kubernetes cluster hosting shared/common services, including HashiCorp Vault. This is a cluster that can serve many other purposes/solutions, consumed by other clusters. The Vault server is deployed on this cluster and serves as an intermediate CA server, under the Microsoft Root CA server.
- A second Kubernetes cluster hosting the application(s). Cert-Manager is deployed on this cluster, integrated with Vault, and handles the management and issuance of TLS certificates against Vault using the ClusterIssuer resource. A web application, exposed via ingress, is running on this cluster. The ingress resource consumes its TLS certificate from Vault.
Prerequisites
- Atleast one running Kubernetes cluster. To follow along, you will need two Kubernetes clusters, one serving as the shared services cluster and the other as the workload/application cluster.
- Access to a Microsoft Root Certificate Authority (CA).
- The Helm CLI installed.
- Clone my GitHub repository. This repository contains all involved manifests, files and configurations needed.
Setting Up HashiCorp Vault as Intermediate CA
Deploy Initialize and Configure Vault
Install the Vault CLI. In the following example, Linux Ubuntu is used. If you are using a different operating system, refer to these instructions.
sudo apt-get update && sudo apt-get install -y gpg wget
wget -O- https://apt.releases.hashicorp.com/gpg | sudo gpg --dearmor --yes -o /usr/share/keyrings/hashicorp-archive-keyring.gpg
echo "deb [signed-by=/usr/share/keyrings/hashicorp-archive-keyring.gpg] https://apt.releases.hashicorp.com $(lsb_release -cs) main" | sudo tee /etc/apt/sources.list.d/hashicorp.list
sudo apt update && sudo apt install vault
Use the vault version command to ensure the CLI is installed.
Example output:
Vault v1.15.4 (9b61934559ba31150860e618cf18e816cbddc630), built 2023-12-04T17:45:28Z
Use the Vault Helm Chart to deploy the Vault Server. In this case, I am deploying Vault to a neutral/shared services cluster.
Since I will be exposing the Vault UI using ingress, I am creating the vault namespace and the Kubernetes secret containing the TLS certificate for the Vault server hostname (e.g., it-vault.cloudnativeapps.cloud). If you are also using ingress to expose the Vault UI externally, make sure your secret contains a valid TLS certificate for the Vault server hostname.
kubectl apply -f vault-ns.yaml
kubectl apply -f vault-ingress-tls-cert.yaml
Modify the vault-helm-values-shared-cluster.yaml file using your Vault hostname under the server.ingress section.
Deploy the Helm Chart.
helm repo add hashicorp https://helm.releases.hashicorp.com
helm repo update

# Version pinning
CHART_VERSION="0.27.0"

# To get the latest chart version (not recommended - look out for breaking changes), use:
# CHART_VERSION=$(helm search repo hashicorp/vault -o json | jq -r '.[0].version')

helm upgrade -i vault hashicorp/vault -n vault --create-namespace --version "$CHART_VERSION" -f vault-helm-values-shared-cluster.yaml
Example output:
Release "vault" does not exist. Installing it now.
NAME: vault
LAST DEPLOYED: Mon Jan 15 22:29:33 2024
NAMESPACE: vault
STATUS: deployed
REVISION: 1
NOTES:
Thank you for installing HashiCorp Vault!

Now that you have deployed Vault, you should look over the docs on using
Vault with Kubernetes available here:

https://developer.hashicorp.com/vault/docs


Your release is named vault. To learn more about the release, try:

  $ helm status vault
  $ helm get manifest vault
Check the status of the pods and the ingress resource in the vault namespace.
kubectl get pods -n vault
Example output:
NAME                                        READY   STATUS    RESTARTS   AGE
pod/vault-0                                 0/1     Running   0          65s
pod/vault-agent-injector-7f7f68d457-hjl6x   1/1     Running   0          66s

NAME                              CLASS    HOSTS                            ADDRESS        PORTS     AGE
ingress.networking.k8s.io/vault   <none>   it-vault.cloudnativeapps.cloud   172.16.53.26   80, 443   66s
Note the status of the vault-0 pod. The container is not in a Ready state because Vault is not yet initialized and unsealed. This is normal.
Initialize Vault and make a note of the unseal keys and the root token.
kubectl exec vault-0 -n vault -- vault operator init
Example output:
Unseal Key 1: 0C1MnHmVoOdSVXD7W9YlaIn3Ij8RzIGyuwxeN11YJTLN
Unseal Key 2: kzZm91FQ8oQex9f5hr/3jQOiwhdUVJAsQbJTI6OZnW49
Unseal Key 3: MnnJ6djg5Gobw81C7EB0LZCXgPwrvwoH8ViRRF4yiuSH
Unseal Key 4: 562uCjROIjGPhlqZBg3QvZ5q7SOSR647z82LfaU7WJrC
Unseal Key 5: LRgYetAqPJgyD4ZTnVWr7n9JADpx2gsWzljjf4DD1IYd

Initial Root Token: hvs.3e9XzJwfXeaQbdImd7SJ1hXv

Vault initialized with 5 key shares and a key threshold of 3. Please securely
distribute the key shares printed above. When the Vault is re-sealed,
restarted, or stopped, you must supply at least 3 of these keys to unseal it
before it can start servicing requests.

Vault does not store the generated root key. Without at least 3 keys to
reconstruct the root key, Vault will remain permanently sealed!

It is possible to generate new unseal keys, provided you have a quorum of
existing unseal keys shares. See "vault operator rekey" for more information.
Use three of the unseal keys to unseal the Vault Server.
UNSEAL_KEYS=("0C1MnHmVoOdSVXD7W9YlaIn3Ij8RzIGyuwxeN11YJTLN" "kzZm91FQ8oQex9f5hr/3jQOiwhdUVJAsQbJTI6OZnW49" "MnnJ6djg5Gobw81C7EB0LZCXgPwrvwoH8ViRRF4yiuSH")

for key in ${UNSEAL_KEYS[@]}; do
  kubectl exec vault-0 -n vault -- vault operator unseal "$key"
  echo ""
done
Example output:
Key                Value
---                -----
Seal Type          shamir
Initialized        true
Sealed             true
Total Shares       5
Threshold          3
Unseal Progress    1/3
Unseal Nonce       9f6714eb-484a-86a3-49e4-e84b12d78f0d
Version            1.15.2
Build Date         2023-11-06T11:33:28Z
Storage Type       file
HA Enabled         false

Key                Value
---                -----
Seal Type          shamir
Initialized        true
Sealed             true
Total Shares       5
Threshold          3
Unseal Progress    2/3
Unseal Nonce       9f6714eb-484a-86a3-49e4-e84b12d78f0d
Version            1.15.2
Build Date         2023-11-06T11:33:28Z
Storage Type       file
HA Enabled         false

Key             Value
---             -----
Seal Type       shamir
Initialized     true
Sealed          false
Total Shares    5
Threshold       3
Version         1.15.2
Build Date      2023-11-06T11:33:28Z
Storage Type    file
Cluster Name    vault-cluster-93ef7c1a
Cluster ID      a575592d-0cd2-d7b2-8d79-2a92174642f8
HA Enabled      false
Make sure the Vault pod is now ready and running.
kubectl get pods -n vault
Example output:
NAME                                    READY   STATUS    RESTARTS   AGE
vault-0                                 1/1     Running   0          7m19s
vault-agent-injector-7f7f68d457-hjl6x   1/1     Running   0          7m20s
Make sure you can now reach the Vault server using the ingress hostname and the root token.
# Extract the Vault hostname from the ingress resource
export VAULT_ADDR=https://$(kubectl get ingress vault -n vault -o jsonpath='{.spec.rules[].host}')

# Set to the root token you obtained when initializing Vault
export VAULT_TOKEN=hvs.3e9XzJwfXeaQbdImd7SJ1hXv
Use the vault status command to test the connection.
Example output:
Key             Value
---             -----
Seal Type       shamir
Initialized     true
Sealed          false
Total Shares    5
Threshold       3
Version         1.15.2
Build Date      2023-11-06T11:33:28Z
Storage Type    file
Cluster Name    vault-cluster-93ef7c1a
Cluster ID      a575592d-0cd2-d7b2-8d79-2a92174642f8
HA Enabled      false
You can also access the Vault UI from your web browser and log in using the same root token.
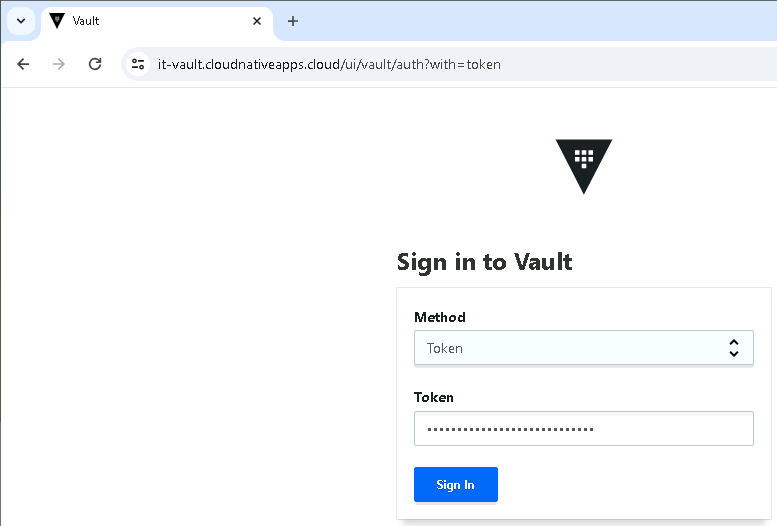
Note: it is not recommended to use the Root token for authentication to Vault. You should configure a different authentication source. This is not covered by this post.
Enable and Configure the PKI Secrets Engine
Enable the PKI secrets engine in Vault. In this example, I am mounting the PKI secrets engine under the pki_int path.
vault secrets enable -path=pki_int pki
Output:
Success! Enabled the pki secrets engine at: pki_int/
Set the maximum lease TTL for the certificates. For example:
vault secrets tune -max-lease-ttl=43800h pki_int
Output:
Success! Tuned the secrets engine at: pki_int/
Generate a CSR
Generate a CSR (Certificate Signing Request) for the intermediate CA in Vault and save it to a file.
vault write -format=json \
pki_int/intermediate/generate/internal common_name="$(kubectl get ingress vault -n vault -o jsonpath='{.spec.rules[].host}') Intermediate Authority" ttl=43800h | \
jq -r '.data.csr' > pki-intermediate-req.csr
Ensure the CSR is valid.
cat pki-intermediate-req.csr
Example output:
-----BEGIN CERTIFICATE REQUEST-----
MIIChTCCAW0CAQAwQDE+MDwGA1UEAxM1aXQtdmF1bHQuY2xvdWRuYXRpdmVhcHBz
LmNsb3VkIEludGVybWVkaWF0ZSBBdXRob3JpdHkwggEiMA0GCSqGSIb3DQEBAQUA
A4IBDwAwggEKAoIBAQDxxfor3bvcoHN2tort+G8Eb2O6M9fzl/eMcRftVIhsWDvn
RpKMaomsL1naizhjIfln0zsul3QfNheRQ83NhQMhHradha/fZNENLQRBGFR57Jwo
JVaIbygDNfLIfv3atvomdtniMVBOhj911je26NcW5LAAr1UExTsHERzqborvFUvn
UN5h3KJXMSTVXYePUAa3LMJ4RjomcPo6nstiuGIoq99E459kRb7PZK3jEbVtKotz
B5Uqjo0mrclbx/a0YvOzdESMpHWfOv2pIVPQbCENz0HlS42ZH+Ig1w1p1tH94/3c
HDLepxFh4LRullUeqcCUjrL3uCZjACNrXoKMZQudAgMBAAGgADANBgkqhkiG9w0B
AQsFAAOCAQEARtXV/Sd4sZ9kIBS9u+q4Rzhrkwez3mlWojigOXbdRNQ+ZlSVy2pt
XY3kTxUYkmVBa7V5t4cGK6Zdux92cDKAhSHWEERdc8zsoDD7enkJQ20UXcXKIrAp
MsFCokzTgqmq+VAuVBUdc/Vs0S3tiBvAFT5hpDn4K3kp5zeOyyyvv5CsaF9yb4hi
H3MeERxyJVZjLWehR7q8rN+Ny56c1cGkuDWie/1xX+W/oZybXhRkAXvfdUsjS6yY
+g1NOhgcTn78fGbcFI13+tLor1gWiOWBhGn+uPuYmgvJyThbJFgDjy4I++U4R30w
YLzpsqqlTD+f6JAgoYYpxSvW5EZwv2muoQ==
-----END CERTIFICATE REQUEST-----
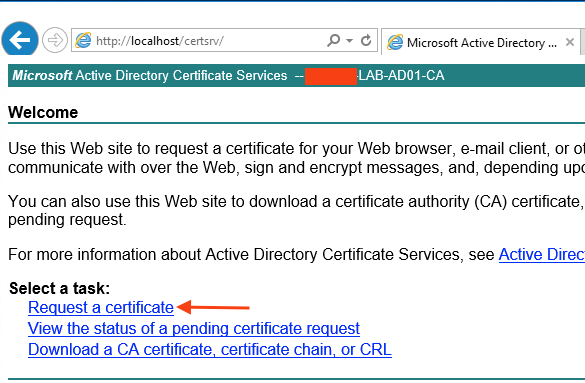
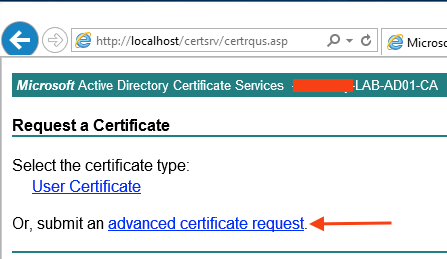
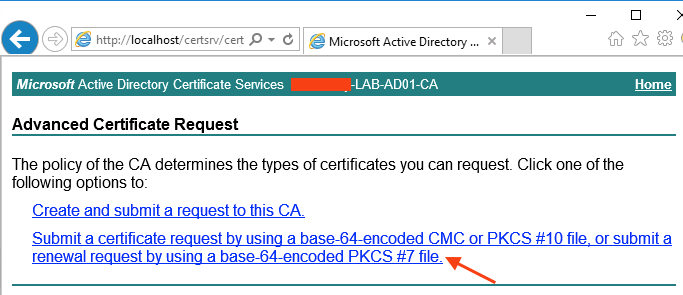
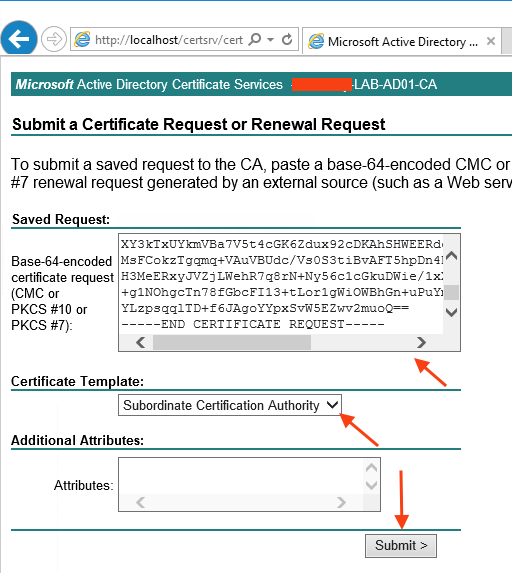
Sign the CSR with Microsoft CA
Submit the CSR to your Microsoft Root CA for signing, and obtain the signed certificate. In this example, I am using the Subordinate Certificate Authority certificate template to sign the intermediate CA certificate.
The procedure should be similar to the following:
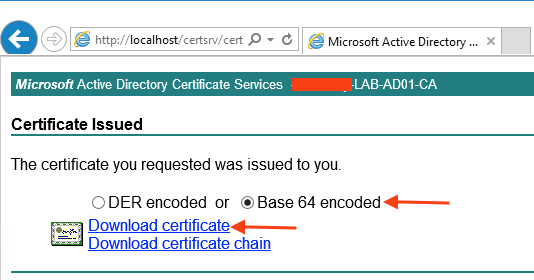
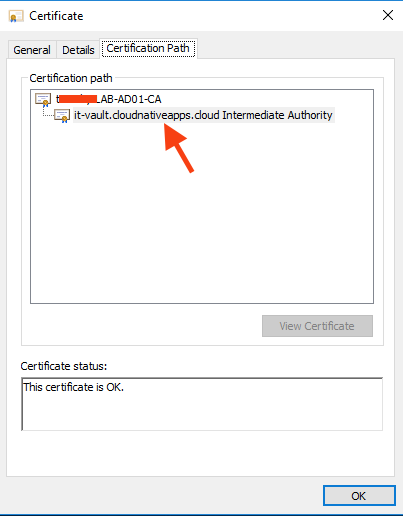
Once you have obtained the signed certificate, open it to view its details.
Under the General tab, you should see that the certificate is issued for the common name you specified when issuing the CSR, by your root CA.
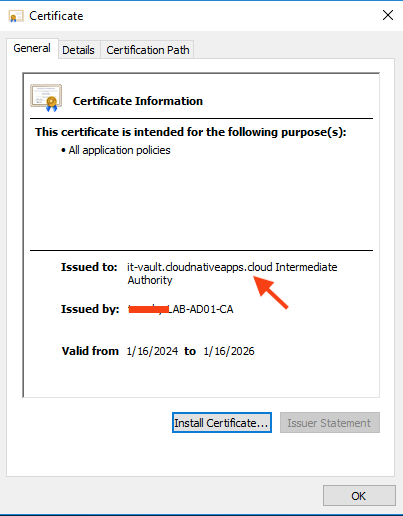
Under the Certification Path tab, you should see the full chain - your Root CA, followed by the new intermediate CA.
Import the Signed Certificate into Vault
Configure authority information access (AIA) fields for the pki_int mount path in Vault.
vault write pki_int/config/urls issuing_certificates="$VAULT_ADDR/v1/pki_int/ca" crl_distribution_points="$VAULT_ADDR/v1/pki_int/crl"
Example output:
Key                        Value
---                        -----
crl_distribution_points    [https://it-vault.cloudnativeapps.cloud/v1/pki_int/crl]
enable_templating          false
issuing_certificates       [https://it-vault.cloudnativeapps.cloud/v1/pki_int/ca]
ocsp_servers               []
Import the signed certificate into Vault:
vault write pki_int/intermediate/set-signed certificate=@intermediate-cert.crt
Example output:
Key                 Value
---                 -----
existing_issuers    [b7e465e2-cd51-e5f2-2990-f8c2e8a9abb7]
existing_keys       <nil>
imported_issuers    <nil>
imported_keys       <nil>
mapping             map[b7e465e2-cd51-e5f2-2990-f8c2e8a9abb7:81a41303-c434-d86b-494d-06fd4d538726]
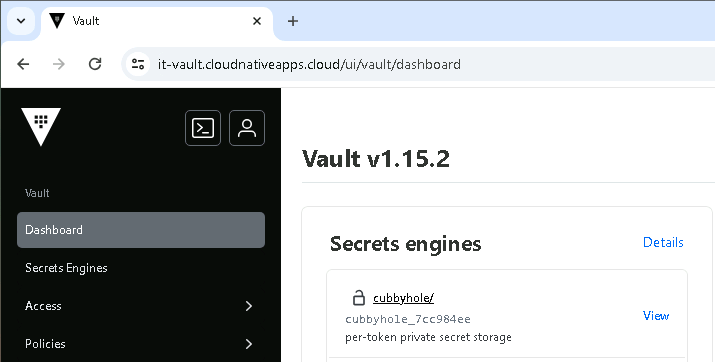
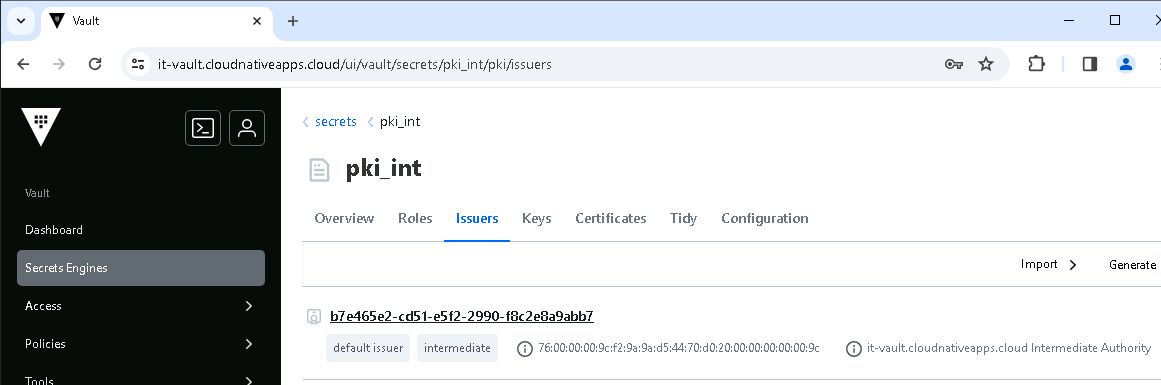
You can also now view the newly created issuer from the Vault UI, under the pki_int mount path.

Create Roles for Certificate Issuance
Define roles in Vault for issuing certificates. In this example, the role is created under the pki_int/roles/cloudnativeapps.cloud path (named after the domain name). I am also allowing sub-domains, limiting the certificates TTL to 72 hours, not enforcing common names for certificates, and only allowing the cloudnativeapps.cloud domain for certificate issuance.
vault write pki_int/roles/cloudnativeapps.cloud \
allow_subdomains=true \
max_ttl=72h \
require_cn=false \
allowed_domains=cloudnativeapps.cloud
Example output:
Key                                   Value
---                                   -----
allow_any_name                        false
allow_bare_domains                    false
allow_glob_domains                    false
allow_ip_sans                         true
allow_localhost                       true
allow_subdomains                      true
allow_token_displayname               false
allow_wildcard_certificates           true
allowed_domains                       [cloudnativeapps.cloud]
allowed_domains_template              false
allowed_other_sans                    []
allowed_serial_numbers                []
allowed_uri_sans                      []
allowed_uri_sans_template             false
allowed_user_ids                      []
basic_constraints_valid_for_non_ca    false
client_flag                           true
cn_validations                        [email hostname]
code_signing_flag                     false
country                               []
email_protection_flag                 false
enforce_hostnames                     true
ext_key_usage                         []
ext_key_usage_oids                    []
generate_lease                        false
issuer_ref                            default
key_bits                              2048
key_type                              rsa
key_usage                             [DigitalSignature KeyAgreement KeyEncipherment]
locality                              []
max_ttl                               72h
no_store                              false
not_after                             n/a
not_before_duration                   30s
organization                          []
ou                                    []
policy_identifiers                    []
postal_code                           []
province                              []
require_cn                            false
server_flag                           true
signature_bits                        256
street_address                        []
ttl                                   0s
use_csr_common_name                   true
use_csr_sans                          true
use_pss                               false
I am also creating the following Vault policy to limit the permissions on the pki_int mouth path, to ensure that Cert-Manager uses the minimum privileges required against VauLT.
pki-policy.hcl:
path "pki_int*" {
    capabilities = ["read", "list"]
}

path "pki_int/sign/cloudnativeapps.cloud" {
    capabilities = ["create", "update"]
}

path "pki_int/issue/cloudnativeapps.cloud" {
    capabilities = ["create"]
}
vault policy write pki_int pki-policy.hcl
Output:
Success! Uploaded policy: pki_int
Test Certificate Issuance
Issue a test certificate to verify the setup.
vault write pki_int/issue/cloudnativeapps.cloud \
common_name=sample-test.cloudnativeapps.cloud
Example output:
Key                 Value
---                 -----
ca_chain            [-----BEGIN CERTIFICATE-----
MIIFPjCCBCagAwIBAgITdgAAAJzymprVRHDQIAAAAAAAnDANBgkqhkiG9w0BAQsF
...
FfQ=
-----END CERTIFICATE-----]
certificate         -----BEGIN CERTIFICATE-----
MIIENzCCAx+gAwIBAgIUDDtge5hUIlbkqJvoEQ9kT0SAchQwDQYJKoZIhvcNAQEL
...
UZ8uurtje9BPHQr2Nft+KMvFuQLdTMYc58QK
-----END CERTIFICATE-----
expiration          1705765937
issuing_ca          -----BEGIN CERTIFICATE-----
MIIFPjCCBCagAwIBAgITdgAAAJzymprVRHDQIAAAAAAAnDANBgkqhkiG9w0BAQsF
ADBOMRUwEwYKCZImiZPyLGQBGRYFbG9jYWwxFzAVBgoJkiaJk/IsZAEZFgd0ZXJh
...
UH/pO+NbarMV/OUN5yoy3ZWb82wMQrNQIPbMb+V04AgFmLXGrSrS374T00jRt/nM
zjCcv73ZGKbKvbAwtUyDuNj3fs5OcNzyckIwZiocldH7x3xjf7LF2dY9oQNPxswO
EVilVmz4rFDSZydRVSH3R9V5gSE6aweJAchCJqMFEWiUpSpzSjO6arA3IjNyccz2
FfQ=
-----END CERTIFICATE-----
private_key         -----BEGIN RSA PRIVATE KEY-----
MIIEpAIBAAKCAQEA0DcryxrnOoLT6N/8s/YvNzXSdEmkTYIbc7o6Zdi9uhl2OXJH
...
RTsE8dzApsCyCsDuv5afEE5o2A5DlyV5JMzXzn+nqcAqkm+3k+WKvw==
-----END RSA PRIVATE KEY-----
private_key_type    rsa
serial_number       0c:3b:60:7b:98:54:22:56:e4:a8:9b:e8:11:0f:64:4f:44:80:72:14
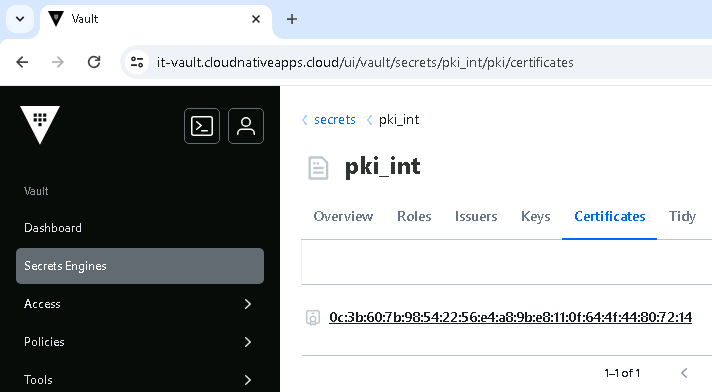
You can also view the issued certificate from the Vault UI.
Integrating with Cert-Manager
Install Cert-Manager
On your workload cluster (where applications reside and the secrets/certificates are needed), deploy Cert-Manager.
You can deploy Cert-Manager using Helm.
helm repo add jetstack https://charts.jetstack.io
helm repo update
helm upgrade -i cert-manager jetstack/cert-manager -n cert-manager --create-namespace --set installCRDs=true
Example output:
Release "cert-manager" does not exist. Installing it now.
NAME: cert-manager
LAST DEPLOYED: Wed Jan 17 17:12:16 2024
NAMESPACE: cert-manager
STATUS: deployed
REVISION: 1
TEST SUITE: None
NOTES:
cert-manager v1.13.3 has been deployed successfully!

In order to begin issuing certificates, you will need to set up a ClusterIssuer
or Issuer resource (for example, by creating a 'letsencrypt-staging' issuer).

More information on the different types of issuers and how to configure them
can be found in our documentation:

https://cert-manager.io/docs/configuration/

For information on how to configure cert-manager to automatically provision
Certificates for Ingress resources, take a look at the `ingress-shim`
documentation:

https://cert-manager.io/docs/usage/ingress/
If you are using a Tanzu Kubernetes Grid (TKG) cluster, the Tanzu CLI should be used to deploy the Cert-Manager package provided by VMware. For example:
tanzu package repository add tanzu-standard --url projects.registry.vmware.com/tkg/packages/standard/repo:v2023.11.21 --namespace tkg-system
kubectl create ns tkg-packages

PKG_NAME=cert-manager.tanzu.vmware.com
PKG_VERSIONS=($(tanzu package available list "$PKG_NAME" -n tkg-system -o json | jq -r ".[].version" | sort -t "." -k1,1n -k2,2n -k3,3n))
PKG_VERSION=${PKG_VERSIONS[-1]}
echo "$PKG_VERSION"

tanzu package install cert-manager \
--package "$PKG_NAME" \
--version "$PKG_VERSION" \
--namespace tkg-packages
Configure Vault Access
You have to create a Kubernetes service account, generate a token for it and set up Vault with a Kubernetes authentication method, which will use the Vault policy we created previously.
You can create the service account and the token declaratively using a standard Kubernetes manifest or imperatively using kubectl. However, I have found that the easiest way to achieve this, in this case, is to deploy the Vault Helm Chart with the following configuration in your values.yaml file:
vault-helm-values-workload-cluster.yaml:
global:
  # Vault hostname
  externalVaultAddr: https://it-vault.cloudnativeapps.cloud
server:
  enabled: false
  serviceAccount:
    createSecret: true
- The
global.externalVaultAddrparameter should be set to the Vault hostname. It will be unused at this point for certificate issuance, but you may need it later on for other Vault use cases, so I recommend setting it. Your Vault deployment on this cluster will interact with the existing Vault instance running on the shared cluster where Vault is deployed. - The
server.enabled=falseparameter will disable the Vault server deployment as it is not needed on the workload cluster, and we are using an existing Vault server. - The
server.serviceAccount.createSecretwill create a secret containing the Vault service account token. Note that this is not the default since Kubernetes version 1.24.
Deploy the Vault Helm Chart.
helm repo add hashicorp https://helm.releases.hashicorp.com
helm repo update

# Version pinning
CHART_VERSION="0.27.0"

# To get the latest chart version (not recommended - look out for breaking changes), use:
# CHART_VERSION=$(helm search repo hashicorp/vault -o json | jq -r '.[0].version')

helm upgrade -i vault hashicorp/vault -n vault --create-namespace --version "$CHART_VERSION" -f vault-helm-values-workload-cluster.yaml
Example output:
Release "vault" does not exist. Installing it now.
NAME: vault
LAST DEPLOYED: Wed Jan 17 17:33:31 2024
NAMESPACE: vault
STATUS: deployed
REVISION: 1
TEST SUITE: None
NOTES:
Thank you for installing HashiCorp Vault!

Now that you have deployed Vault, you should look over the docs on using
Vault with Kubernetes available here:

https://developer.hashicorp.com/vault/docs


Your release is named vault. To learn more about the release, try:

  $ helm status vault
  $ helm get manifest vault
If you run kubectl get pod -n vault, you will see that no Vault server was deployed. Only the Vault Agent Injector should be listed. For example:
NAME                                    READY   STATUS    RESTARTS   AGE
vault-agent-injector-86b5b775b9-ls5bp   1/1     Running   0          22s
View the Vault service account and its token secret.
kubectl get sa,secret -n vault
Example output:
NAME                                  SECRETS   AGE
serviceaccount/default                0         2m9s
serviceaccount/vault                  0         2m9s
serviceaccount/vault-agent-injector   0         2m9s

NAME                                 TYPE                                  DATA   AGE
secret/sh.helm.release.v1.vault.v1   helm.sh/release.v1                    1      2m9s
secret/vault-token                   kubernetes.io/service-account-token   3      2m9s
The vault service account and its token (vault-token) will be used for the Auth Method configuration.
Next, create a Kubernetes Auth Method in Vault. Since you may have multiple Kubernetes clusters, it is recommended that you mount the Auth Method path under a name matching the Kubernetes cluster name.
For example:
K8S_CLUSTER_NAME=it-tkg-wld-cls-01
VAULT_K8S_MOUNT_PATH="k8s-$K8S_CLUSTER_NAME"
vault auth enable -path="$VAULT_K8S_MOUNT_PATH" kubernetes
Example output:
Success! Enabled kubernetes auth method at: k8s-it-tkg-wld-cls-01/
To complete the Auth Method configuration, you have to retrieve the Vault service account token, the Kubernetes API Server CA certificate and the Kubernetes API Server endpoint.
For example:
VAULT_SA_TOKEN=$(kubectl get secret vault-token -n vault -o jsonpath='{.data.token}' | base64 -d)
KUBERNETES_CA_CERT=$(kubectl config view --raw --minify --flatten -o jsonpath='{.clusters[0].cluster.certificate-authority-data}' | base64 -d)
KUBERNETES_HOST=$(kubectl config view --raw --minify --flatten -o jsonpath='{.clusters[0].cluster.server}')
Use echo to ensure the environment variables are valid.
echo ""
echo "Vault SA token: $VAULT_SA_TOKEN"
echo ""

echo "Kubernetes CA cert: $KUBERNETES_CA_CERT"
echo ""

echo "Kubernetes host: $KUBERNETES_HOST"
echo ""
Example output:
Vault SA token: eyJhbGciOiJSUzI1NiIsImtpZCI6IjBUSGx0OTBiTV...

Kubernetes CA cert: -----BEGIN CERTIFICATE-----
MIIC6jCCAdKgAwIBAgIBADANBgkqhkiG9w0BAQsFADAVMRMwEQYDVQQDEwprdWJl
cm5ldGVzMB4XDTIzMTIyMDIxNTE0N1oXDTMzMTIxNzIxNTY0N1owFTETMBEGA1UE
...
hO/Ti3wJ3bhUr3k4k+zv/AtxnudAfnTFll3ZcyLw
-----END CERTIFICATE-----

Kubernetes host: https://172.16.53.25:6443
Configure the Auth Method.
vault write "auth/$VAULT_K8S_MOUNT_PATH/config" \
token_reviewer_jwt="$VAULT_SA_TOKEN" \
kubernetes_host="$KUBERNETES_HOST" \
kubernetes_ca_cert="$KUBERNETES_CA_CERT"
Example output:
Success! Data written to: auth/k8s-it-tkg-wld-cls-01/config
On the Kubernetes cluster, create a service account (e.g., vault-cluster-issuer) and a token (e.g., vault-cluster-issuer-token) in the cert-manager for Cert-Manager to use for issuing the certificates.
vault-cluster-issuer-sa.yaml:
apiVersion: v1
kind: ServiceAccount
metadata:
  name: vault-cluster-issuer
  namespace: cert-manager
---
apiVersion: v1
kind: Secret
type: kubernetes.io/service-account-token
metadata:
  name: vault-cluster-issuer-token
  namespace: cert-manager
  annotations:
    kubernetes.io/service-account.name: vault-cluster-issuer
kubectl apply -f vault-cluster-issuer-sa.yaml
Create the issuer role in Vault referencing the vault-cluster-issuer service account, the cert-manager namespace and the pki_int access policy we created previously.
vault write "auth/$VAULT_K8S_MOUNT_PATH/role/issuer" \
bound_service_account_names=vault-cluster-issuer \
bound_service_account_namespaces=cert-manager \
policies=pki_int \
ttl=20m
Example example:
Success! Data written to: auth/k8s-it-tkg-wld-cls-01/role/issuer
Create a ClusterIssuer Resource for Vault
Define a ClusterIssuer resource for Vault in Kubernetes, specifying how Cert-Manager should authenticate with Vault and the roles to use.
If your Vault ingress uses a certificate issued by a private CA (which is not publicly trusted), you have to create a secret containing that CA certificate, for Cert-Manager to trust it when interacting with Vault. For example:
vault-ca-cert.yaml:
apiVersion: v1
kind: Secret
type: Opaque
metadata:
  name: vault-ca-cert
  namespace: cert-manager
data:
  # Base64-encoded CA certificate
  ca.crt: LS0tLS1CRUdJTiBDRVJUSUZJQ0FURS0tLS0tCk1JSURkekNDQW
kubectl apply -f vault-ca-cert.yaml
Define the ClusterIssuer resource. For example:
vault-cluster-issuer.yaml:
apiVersion: cert-manager.io/v1
kind: ClusterIssuer
metadata:
  name: vault-cluster-issuer
spec:
  vault:
    server: https://it-vault.cloudnativeapps.cloud
    path: pki_int/sign/cloudnativeapps.cloud
    caBundleSecretRef:
      name: vault-ca-cert
    auth:
      kubernetes:
        mountPath: /v1/auth/k8s-it-tkg-wld-cls-01
        role: issuer
        secretRef:
          name: vault-cluster-issuer-token
          key: token
Set:
spec.vault.serverto the Vault hostname.spec.vault.pathto the path where Cert-Manager is allowed to issue certificates. This is the same path specified in the Vault access policy (pki-policy.hcl).spec.vault.caBundleSecretRefto the secret containing the Vault CA certificate.spec.vault.auth.kubernetes.mountPathto the Kubernetes Auth Method mount path.spec.vault.auth.kubernetes.roleto the Vault issuer role we created previously.spec.vault.auth.kubernetes.secretRef.nameto the Vault Cluster Issuer token secret we created previously.
Create the ClusterIssuer.
kubectl apply -f vault-cluster-issuer.yaml
Check the status of the ClusterIssuer and make sure it is Ready.
kubectl get clusterissuer
Example output:
NAME                   READY   AGE
vault-cluster-issuer   True    6s
Issue Certificates
Create a Certificate resource specifying the Vault ClusterIssuer as the issuer, the common name and DNS names for the certificate, and the target secret name to store the resulting certificate
sample-cert.yaml:
apiVersion: cert-manager.io/v1
kind: Certificate
metadata:
  name: sample-k8s-cert
  namespace: default
spec:
  issuerRef:
    name: vault-cluster-issuer
    kind: ClusterIssuer
  secretName: sample-k8s-cert-tls
  commonName: sample-k8s-cert.cloudnativeapps.cloud
  dnsNames:
  - sample-k8s-cert.cloudnativeapps.cloud
kubectl apply -f sample-cert.yaml
List the certificate and certificate requests. Ensure the certificate is approved and ready.
kubectl get certificaterequests
kubectl get certificate
Example output:
NAME                APPROVED   DENIED   READY   ISSUER                 REQUESTOR                                         AGE
sample-k8s-cert-1   True                True    vault-cluster-issuer   system:serviceaccount:cert-manager:cert-manager   3s

NAME              READY   SECRET                AGE
sample-k8s-cert   True    sample-k8s-cert-tls   35s
Ensure the sample-k8s-cert-tls secret containing the certificate has been created.
kubectl get secret
Example output:
NAME                  TYPE                DATA   AGE
sample-k8s-cert-tls   kubernetes.io/tls   3      4m44s
View the content of the certificate and ensure it contains the certificate, the key and the CA.
kubectl get secret sample-k8s-cert-tls -o yaml
Example output:
apiVersion: v1
data:
  ca.crt: LS0tLS1CRUdJTi...
  tls.crt: LS0tLS1CRUdJTiBDRVJUSUZJQ0FUR...
  tls.key: LS0tLS1CRU...
kind: Secret
metadata:
  annotations:
    cert-manager.io/alt-names: sample-k8s-cert.cloudnativeapps.cloud
    cert-manager.io/certificate-name: sample-k8s-cert
    cert-manager.io/common-name: sample-k8s-cert.cloudnativeapps.cloud
    cert-manager.io/ip-sans: ""
    cert-manager.io/issuer-group: ""
    cert-manager.io/issuer-kind: ClusterIssuer
    cert-manager.io/issuer-name: vault-cluster-issuer
    cert-manager.io/uri-sans: ""
  creationTimestamp: "2024-01-17T18:30:41Z"
  labels:
    controller.cert-manager.io/fao: "true"
  name: sample-k8s-cert-tls
  namespace: default
  resourceVersion: "4881383"
  uid: a0d6c730-1ad8-4e6d-91c8-9ec4c6e3f68f
type: kubernetes.io/tls
Using a Vault-Generated TLS Certificate in Ingress Resources
In this section, a sample web application is deployed and exposed via ingress, using a Vault-generated TLS certificate.
Note: for this example, the NGINX ingress controller is used, as well as NSX ALB as a LoadBalancer provider, and External DNS to automatically register the ingress hostname in my DNS servers.
The application used is httpbin-api.
Use the sample-app-deployment.yaml manifest to create a namespace, a service and a deployment.
kubectl apply -f sample-app-deployment.yaml
Check the status of the httpbin-api Pod and ensure it is running.
kubectl get pod -n httpbin-api
Example output:
NAME                          READY   STATUS    RESTARTS   AGE
httpbin-api-9d559f9bb-d5qnz   1/1     Running   0          43s
Define an ingress resource to expose the application, specifying the Vault Cluster Issuer we created previously.
sample-app-ingress.yaml:
apiVersion: networking.k8s.io/v1
kind: Ingress
metadata:
  name: httpbin-api-ingress
  namespace: httpbin-api
  annotations:
    cert-manager.io/cluster-issuer: vault-cluster-issuer
    kubernetes.io/ingress.allow-http: "false"
    ingress.kubernetes.io/force-ssl-redirect: "true"
spec:
  ingressClassName: nginx
  rules:
  - host: httpbin-api.cloudnativeapps.cloud
    http:
      paths:
      - pathType: Prefix
        path: /
        backend:
          service:
            name: httpbin-api
            port:
              number: 80
  tls:
  - hosts:
    - httpbin-api.cloudnativeapps.cloud
    secretName: httpbin-api-ingress-tls-cert
The cert-manager.io/cluster-issuer: vault-cluster-issuer annotation is used to specify the Vault Cluster Issuer. Upon a successful certificate issuance, the certificate will be stored in the secret specified in spec.tls.[].secretName, e.g., httpbin-api-ingress-tls-cert.
Apply the ingress manifest.
kubectl apply -f sample-app-ingress.yaml
Check the ingress resource.
kubectl get ingress -n httpbin-api
Example output:
NAME                  CLASS   HOSTS                               ADDRESS        PORTS     AGE
httpbin-api-ingress   nginx   httpbin-api.cloudnativeapps.cloud   172.16.53.27   80, 443   78s
Verify that a secret containing the certificate has been created.
kubectl get secret -n httpbin-api
Example output:
NAME                           TYPE                DATA   AGE
httpbin-api-ingress-tls-cert   kubernetes.io/tls   3      13m
View the content of the certificate and ensure it contains the certificate, the key and the CA.
kubectl get secret httpbin-api-ingress-tls-cert -n httpbin-api -o yaml
Example output:
apiVersion: v1
data:
  ca.crt: LS0tLS1CRUdJTiBDRVJUSUZJQ0F...
  tls.crt: LS0tLS1CRUdJTiBDRVJUSUZJQ0FUR...
  tls.key: LS0tLS1CRUdJTiBSU0EgUFJJVkFURSBL...
kind: Secret
metadata:
  annotations:
    cert-manager.io/alt-names: httpbin-api.cloudnativeapps.cloud
    cert-manager.io/certificate-name: httpbin-api-ingress-tls-cert
    cert-manager.io/common-name: ""
    cert-manager.io/ip-sans: ""
    cert-manager.io/issuer-group: cert-manager.io
    cert-manager.io/issuer-kind: ClusterIssuer
    cert-manager.io/issuer-name: vault-cluster-issuer
    cert-manager.io/uri-sans: ""
  creationTimestamp: "2024-01-17T18:46:41Z"
  labels:
    controller.cert-manager.io/fao: "true"
  name: httpbin-api-ingress-tls-cert
  namespace: httpbin-api
  resourceVersion: "4884597"
  uid: 1ac3f819-3ba7-49af-9a5c-7a8df7996ea6
type: kubernetes.io/tls
Access the application from your web browser (e.g., https://httpbin-api.cloudnativeapps.cloud) and verify that it’s reachable.
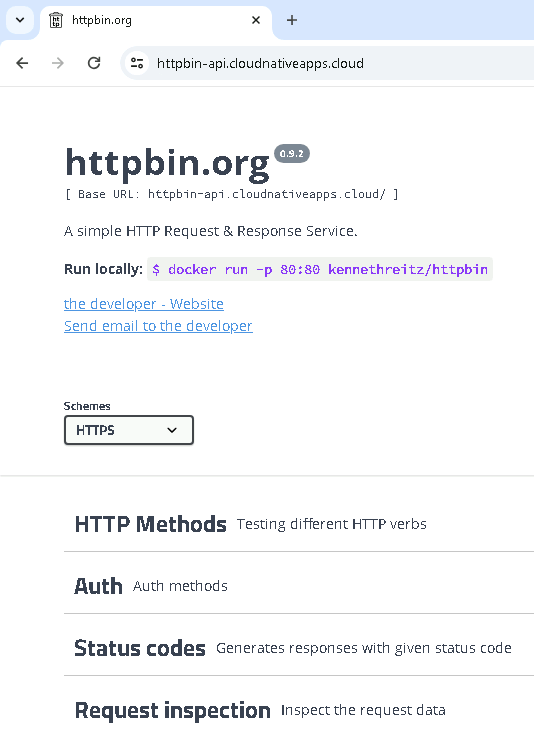
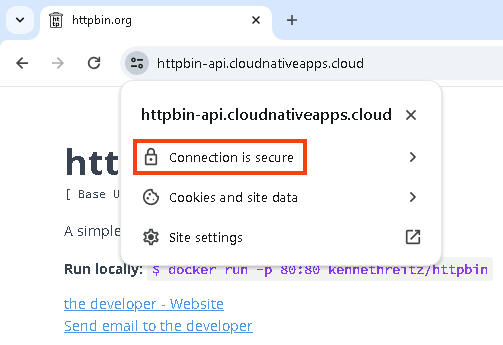
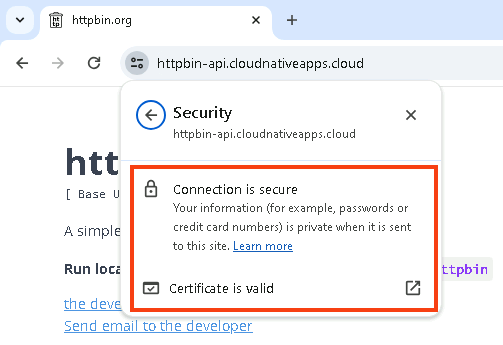
Check the connection status. The connection should be secure and the certificate should be valid.
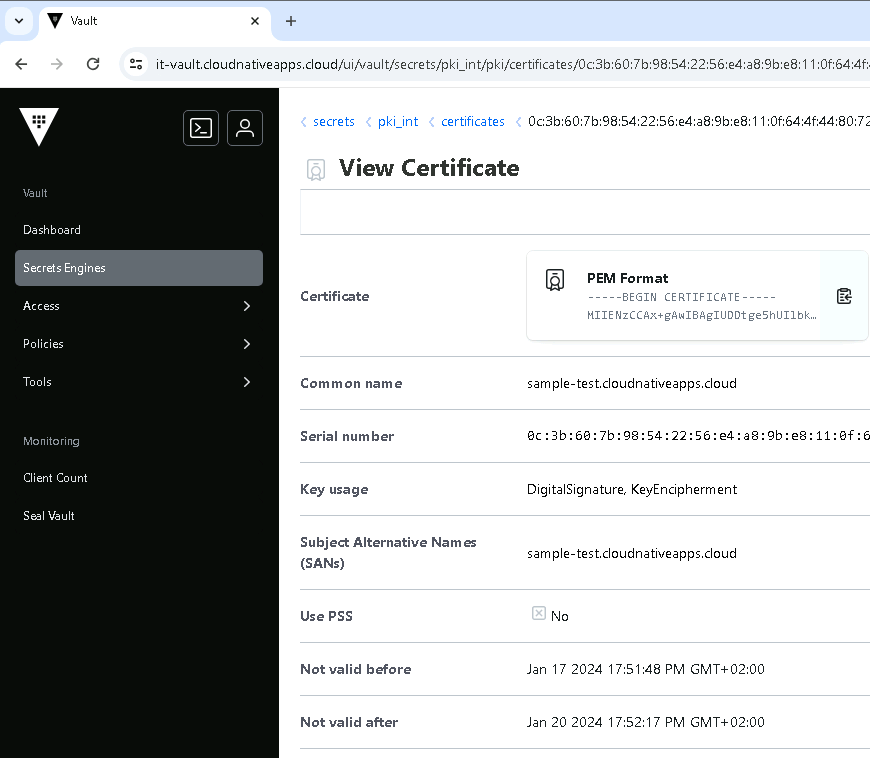
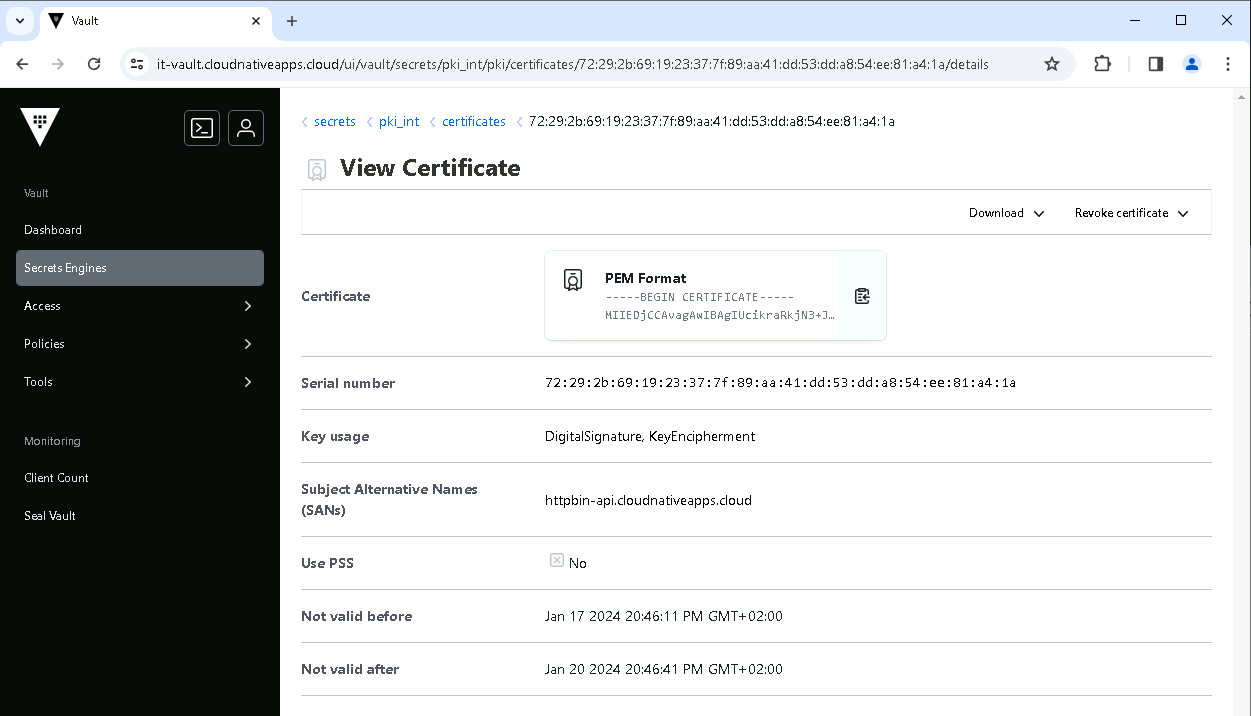
Check the certificate details. You should see that it’s signed by the Vault Intermediate CA.
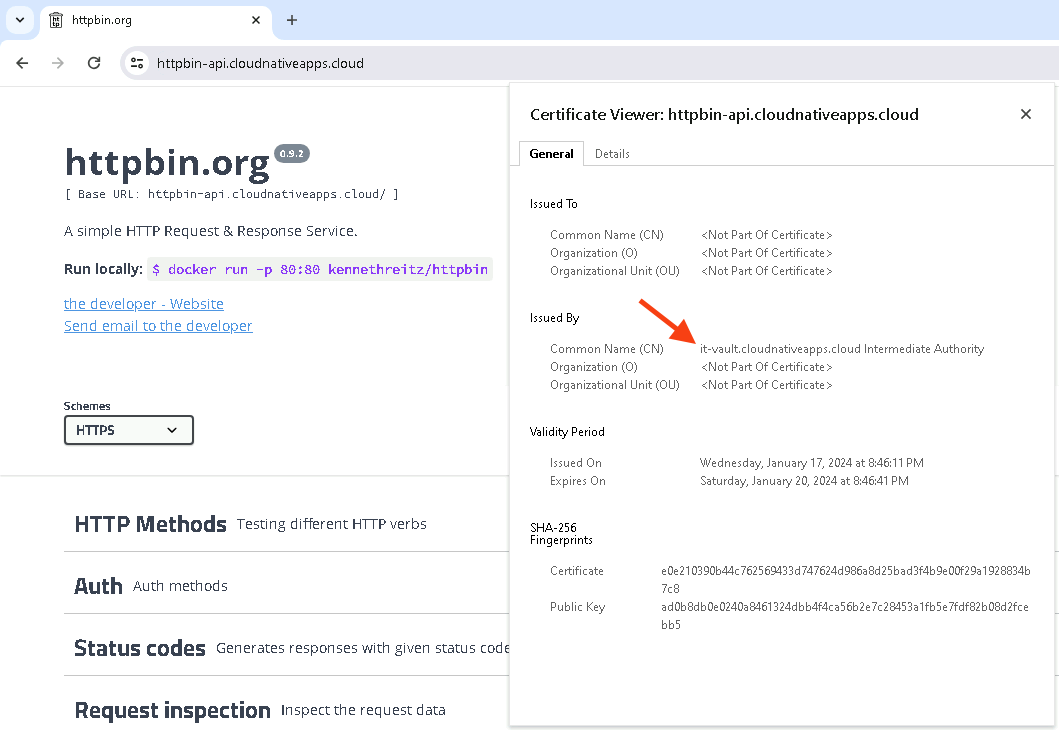
Note: for the connection to show as secure, your machine must trust the root CA. If it trusts your root CA, it will automatically trust your intermediate CA, as the root signed it.
From the Vault UI, you can also see the newly created certificate.
You can also have a look at the Cert-Manager controller logs.
kubectl logs -n cert-manager $(kubectl get pods -n cert-manager -l app.kubernetes.io/component=controller -o jsonpath='{.items[].metadata.name}')
Example output:
...
I0117 18:46:41.362891       1 trigger_controller.go:215] "cert-manager/certificates-trigger: Certificate must be re-issued" key="httpbin-api/httpbin-api-ingress-tls-cert" reason="DoesNotExist" message="Issuing certificate as Secret does not exist"
I0117 18:46:41.362922       1 conditions.go:203] Setting lastTransitionTime for Certificate "httpbin-api-ingress-tls-cert" condition "Ready" to 2024-01-17 18:46:41.3629143 +0000 UTC m=+5661.771152763
I0117 18:46:41.362934       1 conditions.go:203] Setting lastTransitionTime for Certificate "httpbin-api-ingress-tls-cert" condition "Issuing" to 2024-01-17 18:46:41.362928958 +0000 UTC m=+5661.771167421
I0117 18:46:41.387529       1 controller.go:162] "cert-manager/certificates-trigger: re-queuing item due to optimistic locking on resource" key="httpbin-api/httpbin-api-ingress-tls-cert" error="Operation cannot be fulfilled on certificates.cert-manager.io \"httpbin-api-ingress-tls-cert\": the object has been modified; please apply your changes to the latest version and try again"
I0117 18:46:41.387710       1 trigger_controller.go:215] "cert-manager/certificates-trigger: Certificate must be re-issued" key="httpbin-api/httpbin-api-ingress-tls-cert" reason="DoesNotExist" message="Issuing certificate as Secret does not exist"
I0117 18:46:41.387749       1 conditions.go:203] Setting lastTransitionTime for Certificate "httpbin-api-ingress-tls-cert" condition "Issuing" to 2024-01-17 18:46:41.387741984 +0000 UTC m=+5661.795980447
I0117 18:46:41.580201       1 conditions.go:263] Setting lastTransitionTime for CertificateRequest "httpbin-api-ingress-tls-cert-1" condition "Approved" to 2024-01-17 18:46:41.580189902 +0000 UTC m=+5661.988428365
I0117 18:46:41.655529       1 conditions.go:263] Setting lastTransitionTime for CertificateRequest "httpbin-api-ingress-tls-cert-1" condition "Ready" to 2024-01-17 18:46:41.655516814 +0000 UTC m=+5662.063755277
I0117 18:46:41.694006       1 conditions.go:192] Found status change for Certificate "httpbin-api-ingress-tls-cert" condition "Ready": "False" -> "True"; setting lastTransitionTime to 2024-01-17 18:46:41.693997002 +0000 UTC m=+5662.102235465
I0117 18:46:41.729421       1 controller.go:162] "cert-manager/certificates-issuing: re-queuing item due to optimistic locking on resource" key="httpbin-api/httpbin-api-ingress-tls-cert" error="Operation cannot be fulfilled on certificates.cert-manager.io \"httpbin-api-ingress-tls-cert\": the object has been modified; please apply your changes to the latest version and try again"
E0117 18:47:04.305332       1 controller.go:98] ingress 'httpbin-api/httpbin-api-ingress' in work queue no longer exists
E0117 18:47:04.320210       1 controller.go:98] ingress 'httpbin-api/httpbin-api-ingress' in work queue no longer exists
I0117 18:54:51.520235       1 conditions.go:203] Setting lastTransitionTime for Certificate "httpbin-api-ingress-tls-cert" condition "Ready" to 2024-01-17 18:54:51.520212165 +0000 UTC m=+6151.928450628
It is also important to note that once the certificate expires, Cert-Manager controller will also automatically renew it.
Troubleshooting
When troubleshooting the integration between Cert-Manager and Vault, the first place to look is the Cert-Manager controller logs as shown above.
Common issues I’ve seen:
- When Vault is sealed, Cert-Manager will receive HTTP 503 errors when attempting to connect to it. Make sure your Vault is reachable and unsealed if you encounter such errors on Cert-Manager controller.
- If your certificates are not created/approved successfully, use the
kubectl get/describe certificaterequestand thekubectl get/describe certificatecommands to get more information and check for errors. - If your Vault server is exposed using a certificate that is not publicly trusted, make sure Cert-Manager trusts your private CA by attaching a secret containing the private CA certificate(s) to the Cluster Issuer resource, as demonstrated in this post.
- A common symptom that is difficult to troubleshoot is HTTP 403 errors on Cert-Manager. Carefully review your Vault configuration (the mount paths used, the Kubernetes Auth Method configuration, the access policy, the issuer role, and the cluster issuer configuration). It is very common to use incorrect mount paths. Make sure the configuration is consistent across all involved resources.
Conclusion
Integrating HashiCorp Vault with cert-manager in Kubernetes provides a robust solution for automated certificate management. This setup leverages the strengths of Vault as an Intermediate CA under a trusted Microsoft Root CA, ensuring a secure and streamlined process for handling TLS certificates in your Kubernetes environment.